
Setting up a home office or a dedicated gaming station is all about balancing aesthetics with physical comfort. Bias lighting—the practice of placing low-intensity RGB lights behind your monitor—is a highly effective way to reduce eye strain. By neutralizing the harsh contrast between a bright screen and a dark room, your eyes do not have to work as hard to adjust to fluctuating contrast levels.
However, powering these lights directly from your computer’s USB ports requires a bit of planning. If done incorrectly, you risk overloaded USB controllers, annoying light flickering, or even damaging your motherboard’s delicate power circuitry. Poorly routed cables can place physical stress on your monitor’s display ports, while low-quality adhesives can melt under the natural heat radiating from your monitor, leaving a sticky, hard-to-clean residue on your expensive display. Doing this job right ensures a clean, safe, and visually stunning setup that turns on and off seamlessly with your PC.
As an Amazon Associate we earn from qualifying purchases at no extra cost to you. Product prices and availability are accurate as of the date shown and are subject to change.

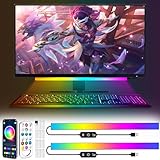
What You Need
Before you begin, gather the necessary tools and hardware. Powering RGB lights from a PC USB port requires components that match your monitor’s size and your motherboard’s power output limitations. Standard USB 2.0 ports deliver 5V at 0.5A (2.5 watts), while USB 3.0 ports deliver 5V at 0.9A (4.5 watts). Keep these power ceilings in mind when selecting your gear.
| Item | Why You Need It | Optional? |
|---|---|---|
| USB-Powered RGB LED Strip | Adheres directly to the back of the monitor. A strip length of 6 to 11.5 feet is ideal for 27-inch to 55-inch displays (typical price range: $8.00 – $15.00). | No (unless using light bars) |
| USB RGB Light Bars | An alternative to adhesive strips; these sit on your desk or mount to the back of the monitor to wash the wall with light (typical price range: $20.00 – $30.00). | Yes |
| 70% Isopropyl Alcohol | Cleans dust, oils, and fingerprints from the back of the monitor so the adhesive backing sticks permanently. | No |
| Microfiber Cloth |
| Applies the alcohol without leaving lint or scratching the monitor casing. | No |
| Adhesive Cable Clips | Secures loose cords and prevents the weight of the USB cable from pulling on the monitor’s ports. | Yes (highly recommended) |
Step-by-Step
Follow these steps to safely mount, route, and power your behind-monitor RGB lights using your PC’s USB ports.
Step 1: Prep and Clean the Monitor Backing (Time Estimate: 5 Minutes)
Unplug your monitor from its power source and lay it face down on a soft, flat surface, such as a clean towel or a large mouse pad. Take your microfiber cloth and dampen it slightly with 70% isopropyl alcohol. Wipe down the entire perimeter of the monitor’s rear casing where you plan to stick the LED strip. Monitors accumulate a thin layer of dust and oils from handling, which will quickly ruin the adhesive on a new LED strip if not cleared away. Allow the plastic to air-dry completely for two minutes before proceeding.
Step 2: Measure and Dry-Run Your Layout (Time Estimate: 5 Minutes)
Before peeling off the adhesive backing, lay your LED strip or position your light bars behind the monitor to plan the physical layout. If you are using a flexible strip, map out how you will navigate the corners. Do not bend the strip at sharp 90-degree angles, as this can crack the internal copper circuitry. Instead, create small, loose loops at the corners (often called “looping” or “pinching”) to preserve the connection. Ensure the USB power cable end of the strip is positioned on the side closest to your PC tower, leaving enough slack so the cable can hang freely without tension.
Step 3: Apply the LED Strip or Position the Light Bars (Time Estimate: 10 Minutes)
Slowly peel away the protective backing of the adhesive strip, working in 6-inch increments. Press the strip firmly onto the cleaned plastic casing of the monitor, holding pressure with your thumb for 5 to 10 seconds on each section. If you are using standalone light bars instead of an adhesive strip, position them on their included stands behind the monitor, angled slightly toward the wall at a 45-degree angle to maximize the light spread.
Step 4: Route and Secure the USB Cable (Time Estimate: 5 Minutes)
Once the lights are mounted, route the USB power cable down the monitor stand. Use adhesive cable clips or hook-and-loop straps to secure the wire to the monitor’s neck. This step is crucial: it prevents the weight of the dangling cable from pulling the light strip off the monitor or straining the USB port. Make sure to leave a “drip loop”—a small amount of slack in the cable—so that if you adjust, tilt, or rotate your monitor, the cable won’t yank out of the PC or the light controller.
Step 5: Connect and Power On (Time Estimate: 5 Minutes)
Plug the USB cable into an available port on your PC. For best results, use a blue USB 3.0 port on the back of your motherboard. These ports offer a higher power output (0.9A) than older USB 2.0 ports (0.5A), ensuring your lights reach their maximum brightness without flickering. Boot up your PC. If your lights feature Bluetooth app integration or an inline remote, pair the device now to configure your color preferences and sync the lighting to your setup.
Mistakes to Avoid
- Overloading Low-Power USB Ports: Avoid plugging long, high-density LED strips (such as those over 12 feet long) into older USB 2.0 ports or unpowered USB hubs. These ports cannot supply enough amperage, which leads to dim lighting, color shifting, or computer system warnings about “USB controller resources exceeded.”
- Creasing the LED Strip: Never fold an LED strip flat to make a sharp corner. This breaks the delicate copper traces inside the flexible PCB, causing the sections after the fold to lose power or display incorrect colors.
- Sticking LEDs Over Vent Grills: Do not block the cooling vents on the back of your monitor with LED strips. Monitors generate heat, and blocking these vents can shorten the lifespan of your monitor’s internal power inverter while causing the strip’s adhesive to melt and fail.
- Pulling Cables Too Taut: Always leave slack in your cables. A tight cable can damage your PC’s USB port or pull your monitor off balance during adjustments.
How Often
Maintaining your bias lighting setup is simple but necessary to keep it looking clean and functioning safely. Dust the back of your monitor and the LED strips once a month using a dry microfiber cloth or a can of compressed air; accumulated dust acts as an insulator, trapping heat and degrading the LEDs over time. Every six months, inspect the adhesive backing to ensure the strip isn’t peeling away at the corners. Additionally, check the USB connection to make sure it remains firmly seated and that the cable isn’t pinching when you adjust your monitor’s height.
When to Call a Pro or Replace
Because USB-powered RGB lights operate on a low-voltage 5V system, they are incredibly safe to handle, meaning you will never need to call an electrician for standard installation. However, you should replace the light strip immediately if you notice individual LEDs flickering, displaying the wrong colors, or failing to light up at all, as this indicates a broken internal circuit. If you detect a hot plastic smell or notice discoloration on the USB connector plug, unplug the unit immediately and discard it. If your PC’s USB port stops functioning entirely after a short circuit, you may need to consult a professional computer repair technician to diagnose motherboard damage.
FAQ
Can I plug RGB lights directly into my PC’s USB port?
Yes. Most modern RGB light strips designed for monitors are rated for 5V power and can be plugged directly into any standard USB port on your PC. For optimal performance and brightness, use a USB 3.0 port (identifiable by its blue interior tab), which provides up to 900mA of current.
Do USB RGB lights drain my PC’s power supply?
The power draw of a standard 5V USB LED strip is incredibly minimal—typically between 2.5 and 4.5 watts. This negligible draw will not impact your PC’s performance or strain your power supply unit (PSU), even when gaming at maximum system load.
How do I make the lights turn off automatically when my PC shuts down?
If your lights stay on after your PC shuts down, it is because your motherboard keeps its USB ports energized to charge devices. You can change this behavior by entering your computer’s BIOS/UEFI settings during startup and enabling “ErP Ready” or “Deep Sleep” states, which cuts power to the USB ports when the system is powered down.
Can I cut the LED strip if it is too long for my monitor?
Yes, but you must only cut along the designated cut lines, which are typically marked with copper pads and a small pair of scissors icon spaced every few inches. Cutting anywhere else will permanently damage that section of the strip and prevent the remaining LEDs from lighting up.
Looking ahead to 2026, modern workspace design continues to prioritize both eye comfort and clean cable management. By taking twenty-five minutes to properly clean, mount, and route your USB-powered RGB lights, you can create a high-performance workspace that looks professional and protects your vision during long sessions at the screen.


