
Setting up a dual-monitor workspace around a MacBook Air sounds simple until you face the port problem. The Air gives you exactly two USB-C ports, and if you’re plugging in two monitors, a keyboard, a mouse, and a card reader, you run out of room in about thirty seconds. Worse, macOS handles dual external displays differently than Windows, so not every hub that promises “dual monitor” support actually delivers two independent extended screens on a Mac.
This guide compares popular USB-C hubs and docks on display support, charging, ports, and build, and explains which setups actually deliver two extended screens on each MacBook Air generation. Whether you’re a spreadsheet wrangler who needs two vertical monitors, a designer matching color across screens, or a student building a compact dorm setup, there’s a hub here that fits your budget and your desk. Below are our four picks, ranked and explained.
Our Top Picks
 MOKiN MacBook Pro Docking Station Dual Monitor MacBook4.84 x 1.85 x 0.65 inches0.2 poundsCheck on Amazon
 Docking Station Dual Monitor 4K HDMI 13-in-1 USB13-in-1 Docking Station (USB C)13 x 0.5 x 5 inches0.3 PoundsCheck on Amazon



Top 3 picks at a glance
Quick Picks
| Product | Best for | Price |
|---|---|---|
| MOKiN Dual Monitor USB-C Docking Station for MacBook | Best overall for dual-monitor MacBook setups | Check on Amazon |
| Anker Laptop Docking Station Dual Monitor, 8-in-1 USB C Hub | Best brand reliability and build quality | Check on Amazon |
| Docking Station Dual Monitor 4K HDMI 13-in-1 USB C Hub | Best port selection for the money | Check on Amazon |
| LIONWEI USB C Docking Station Dual Monitor | Best budget dual-HDMI value | Check on Amazon |
How We Compared
We started with compact dual-HDMI hubs, but many “dual monitor” hubs only mirror on Macs, so the extended-display limits of each MacBook Air chip are covered in detail further down. We then prioritized models with 4K HDMI output, pass-through charging of at least 85W so your laptop never starves for power, and a healthy mix of USB-A ports, card readers, and Ethernet where available.
Price mattered, but so did staying power: a hub lives on your desk, gets plugged and unplugged daily, and needs to run cool under load. We looked at real-world usability — cable length, weight, whether the housing gets hot enough to throttle — and read through owner feedback patterns to spot recurring complaints like dropped connections or flaky SD card slots. Prices shift often during sale events, so the picks below are described by tier rather than exact figures.
The 4 Best Picks
MOKiN Dual Monitor USB-C Docking Station for MacBook Air and Pro — Best Overall
The MOKiN hits the sweet spot for most MacBook Air owners: dual-monitor output, a feature set that covers everyday needs, and a price that won’t make you wince. It’s the hub we’d hand to someone setting up a permanent desk who wants plug-and-play simplicity without paying flagship-dock money.
- Pros: Dual HDMI outputs plus pass-through charging that keeps your Air topped up (whether both screens extend depends on your Air’s chip; see the display table below)
- Pros: Solid aluminum housing that sheds heat well during long work sessions
- Con: No Ethernet port, so Wi-Fi-dependent users lose the option of a wired connection
Skip it if you need a huge port array — creative pros with card readers, external drives, and Ethernet should look at the 13-in-1 below instead.
As an Amazon Associate we earn from qualifying purchases at no extra cost to you.


Anker Laptop Docking Station Dual Monitor, 8-in-1 USB C Hub with 4K HDMI — Best for Reliability
Anker’s reputation for build quality carries through here. This 8-in-1 hub feels like a finished product: clean industrial design, a braided captive cable, and firmware behavior that just works. If you’ve been burned by no-name hubs that drop a monitor connection mid-presentation, the premium over budget options buys genuine peace of mind, backed by a well-regarded warranty and support team.
- Pros: 4K HDMI output paired with a second display connection, plus dependable long-term stability that cheaper hubs struggle to match
- Pros: Thoughtful port spacing — full-size USB devices don’t block neighboring ports
- Con: It’s the priciest of the four compact hubs, and the port count trails the 13-in-1 alternatives
Skip it if maximizing ports per dollar is your priority; you’re partly paying for the name and the warranty.
Docking Station Dual Monitor 4K HDMI 13-in-1 USB C Hub for Laptop MacBook — Best Port Selection
This is the dock for people whose desk looks like a cable swap meet. With thirteen ports in one unit — dual 4K HDMI, a stack of USB-A ports, SD and microSD slots, Ethernet, and audio — you can permanently connect two monitors, an external drive, a card reader, wired internet, and a keyboard without ever reaching behind the laptop again. It effectively replaces a full desktop dock at a mid-range price.
- Pros: Thirteen ports including dual 4K HDMI and gigabit Ethernet — the widest connectivity of any pick here
- Pros: For a mid-range hub, the per-port value is hard to beat
- Con: The busy port layout and larger footprint demand more desk space and take longer to learn
Skip it if you want a minimalist travel hub that disappears in a laptop sleeve.
Docking Station for MacBook Pro Air, LIONWEI USB C Docking Station Dual Monitor — Best Budget Value
As a budget pick, the LIONWEI is the value shocker of this roundup. It delivers the essentials a dual-monitor MacBook user actually needs: two HDMI outputs, three USB 3.0 ports for peripherals, SD and TF card readers, and a 100W PD pass-through charging port so your Air charges at full wattage while everything else runs. It’s a spare-desk or second-location dock you can buy without thinking twice.
- Pros: Dual HDMI plus 100W PD charging in the lowest price tier of the four compact hubs
- Pros: Three USB 3.0 ports and dual card readers cover most desk peripherals
- Con: Build quality and finish feel budget-tier; it’s lighter and less premium than the Anker
Skip it if you need Ethernet or a polished, heavy chassis that stays put on a busy desk.
More Docks for Two Monitors on a MacBook Air
The four hubs above are compact, low-cost options. The catch is that a MacBook Air’s ability to run two extended screens depends heavily on which chip it has, and inexpensive single-cable hubs cannot work around that limit. The docks below cover the two reliable routes: Thunderbolt or USB4 docks for newer Airs that support two displays natively, and DisplayLink docks that add extra screens through a driver on M1 and M2 models.
Plugable Thunderbolt 4 Dock for M4/M5 MacBook Air & Pro (TBT-UDM)
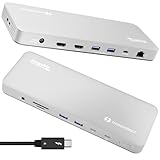
Plugable designed the TBT-UDM specifically for Apple Silicon Macs that support two external displays natively, and it is the simplest single-cable way to run two monitors from an M4 or newer MacBook Air. It is a 13-port Thunderbolt 4 dock built on Intel’s JHL8440 controller, with two HDMI 2.0 outputs that each drive a 4K display at 60Hz without any extra driver. Plugable advertises 100W host charging, with a 96W certified figure, which is more than any MacBook Air needs.
The port list covers a full desk: two 10Gbps USB-A ports, a 10Gbps USB-C port, two 5Gbps USB-A ports, Gigabit Ethernet, an audio jack, UHS-II SD and microSD readers, a downstream Thunderbolt 4 port and a lock slot. The front Thunderbolt port can drive a single 6K display on macOS, which is useful for an Apple Studio Display. A 3.3-foot Thunderbolt 4 cable and power supply are included.
Who it suits: M4 and M5 MacBook Air owners who want two extended screens, wired internet and card readers through one cable, with no driver to install. Base M3 Airs can also run two displays through it, but only with the lid closed. Drawbacks: it costs several times as much as the budget hubs above, the HDMI ports top out at 4K 60Hz, and on a base M1 or M2 Air it can still only extend one external display. Compared with the MOKiN and Anker picks, it is the dependable way to get true extended dual monitors on a newer Air rather than relying on hub behavior.
UGREEN 11-in-1 USB4 Docking Station, Dual Monitor 4K@120Hz

UGREEN’s newer USB4 dock is a flat, horizontal unit that slides under a monitor riser and connects through an attached 2.6-foot USB4 cable with up to 40Gbps of bandwidth. On the back it has an HDMI 2.1 port, a downstream 20Gbps USB4 port, two 5Gbps USB-A ports, 2.5Gbps Ethernet and a USB-C power input; the front has an audio combo jack, SD and microSD readers, and 10Gbps USB-C and USB-A ports. UGREEN includes a USB-C to DisplayPort cable so the downstream USB4 port can drive the second monitor.
The headline feature is support for two extended 4K displays at up to 120Hz on compatible laptops, or a single display at up to 4K 240Hz. On a MacBook Air, the practical limit is set by the Mac itself: Apple lists Air external display support in 60Hz terms, so expect two smooth 4K 60Hz screens on an M4 or newer Air and treat the 120Hz capability as headroom for a future MacBook Pro or Windows laptop. Charging reaches up to 115W to the laptop when a suitable USB-C charger is connected.
Who it suits: buyers who want a modern dock with faster Ethernet and USB than the budget hubs, and who might later move to a laptop that can use high refresh rates. Drawbacks: the power adapter is not included, so you need your own high-wattage USB-C charger; the attached cable limits placement; and base M1 and M2 Airs are still limited to one external display. It sits between the budget hubs and the Plugable and CalDigit Thunderbolt docks in cost.
UGREEN Revodok Pro 209 DisplayLink Docking Station (CM615)

If you own an M1 or M2 MacBook Air, a DisplayLink dock is the only practical way to run two external monitors, and the UGREEN CM615 is one of the best-value examples. It uses a DisplayLink chipset that compresses and sends video over USB, so the Mac’s native one-display limit does not apply. The dock has two HDMI and two DisplayPort outputs, each rated for 3840×2160 at 60Hz, and you can use any two at once, choosing HDMI or DisplayPort for each screen.
The rest of the dock is lean but useful: a 10Gbps USB-C port, two 10Gbps USB-A ports, Gigabit Ethernet and a USB-C power input that passes up to 100W to the laptop. The aluminum body is compact enough for a small desk. There is no card reader, and the power adapter is sold separately.
Who it suits: M1 and M2 Air owners who need two monitors for spreadsheets, coding or office work. Drawbacks: the DisplayLink Manager app must be installed and kept updated, and the dock needs screen recording permission in macOS to work. Some protected streaming video may refuse to play on DisplayLink screens, and fast-moving games or video editing can show more lag than a native connection. Compared with the dual-HDMI hubs above, it actually extends two displays on M1 and M2 Airs rather than mirroring them.
WAVLINK USB-C DisplayLink Docking Station, Dual 4K@60Hz (2 HDMI + 2 DP)

WAVLINK’s DisplayLink dock is a more port-heavy alternative to the UGREEN for people who want to plug everything into one box. It offers two HDMI and two DisplayPort outputs that drive two 4K displays at 60Hz through DisplayLink, plus 100W charging to the laptop, Ethernet, a 10Gbps USB-C port and a stack of USB-A ports in a 13-port layout. It is universal, so the same dock works with Windows laptops and Macs from M1 through current models once the driver is installed.
Who it suits: shared desks and hot-desking setups where a MacBook Air and a Windows laptop might use the same monitors, or M1 and M2 Air owners who want more USB ports than the UGREEN offers. Like every DisplayLink dock, it can add a second screen to a Mac that normally supports only one.
Strengths: more ports than most DisplayLink docks, flexible HDMI or DisplayPort outputs and full charging for any MacBook Air. Drawbacks: four video ports still mean only two monitors at a time; the driver requirement and screen recording permission apply; and protected video playback can be unreliable on DisplayLink outputs. WAVLINK sells several similar-looking models with different charging levels, so confirm that the listing you choose specifies 100W charging and dual 4K 60Hz output.
CalDigit TS4 Thunderbolt 4 Dock

The CalDigit TS4 is the premium choice for a permanent MacBook desk and one of the most complete Thunderbolt docks available. It has 18 ports, including three downstream Thunderbolt 4 ports at 40Gbps, three 10Gbps USB-C ports, five 10Gbps USB-A ports, 2.5GbE Ethernet, a DisplayPort output, UHS-II SD and microSD readers, and audio connections. It delivers 98W of charging to the laptop and is rated for a single 8K 30Hz display or two 6K 60Hz displays on capable computers.
Who it suits: M4 and newer MacBook Air owners who want room to grow, as well as anyone who might move to a MacBook Pro later. On an Air with native dual-display support, you can connect one monitor to the DisplayPort output and one to a downstream Thunderbolt port with a USB-C or Thunderbolt cable or adapter. The 2.5GbE port and fast USB ports make it a hub for NAS drives and external SSDs, not just monitors.
Strengths: build quality, port count, sustained charging and broad compatibility. Drawbacks: it is the most expensive dock in this guide by a wide margin, it is large and heavy for a travel bag, and it cannot get around the one-external-display limit on base M1 and M2 Airs. If you only need two monitors and a few USB ports, the Plugable TBT-UDM covers the essentials for less.
Kensington SD4750P USB-C DisplayLink Docking Station

Kensington’s SD4750P is a business-grade DisplayLink dock that has been a staple of office desks for years, and it remains a solid way to give an M1 or M2 MacBook Air two extended monitors. It drives two displays at up to 3840×2160 at 60Hz through four video outputs, two HDMI 2.0 and two DisplayPort 1.2, so you can mix and match cables with whatever monitors you already own. Only two screens run at a time.
A 135W power adapter is included, and the dock passes up to 85W to the laptop, which comfortably covers any MacBook Air. Ports include Gigabit Ethernet, four rear USB-A 5Gbps ports, a front USB-C and a front USB-A port for charging and data, separate headphone and microphone jacks, and a lock slot. It is a hybrid dock, so it also works with older USB-A laptops, which is handy in a shared office.
Who it suits: offices and home workers who want a dock with an included power supply and a long warranty, especially when one desk serves both Macs and Windows laptops. Kensington backs it with three years of coverage. Drawbacks: the USB ports are 5Gbps rather than 10Gbps, there is no card reader, the body is larger than the compact hubs above, and it needs the DisplayLink driver with the same streaming and fast-motion limitations as other DisplayLink docks. Compared with the UGREEN CM615, it trades faster USB for an included power brick and more front-panel convenience.
Which Dock Fits Your MacBook Air and Workflow?
- M1 or M2 Air, office work on two screens: A DisplayLink dock such as the UGREEN CM615, WAVLINK or Kensington SD4750P. These are the only picks in this guide that reliably extend two monitors on those chips.
- M3 Air: A Thunderbolt or USB4 dock works for two screens if you are happy to work with the lid closed. If you want the built-in screen as a third display, choose DisplayLink.
- M4 or later Air: The Plugable TBT-UDM is the most straightforward driver-free choice; the UGREEN USB4 dock adds 2.5GbE and future 120Hz headroom; the CalDigit TS4 is the premium all-in-one desk hub.
- Travel and occasional desk use: One of the compact hubs from the main list, used with a single external monitor, keeps the bag light. Add a second screen only at the desk where a full dock lives.
- Shared desk with Windows laptops: DisplayLink docks are universal and behave the same on almost any laptop, which makes them easier to share than MST hubs.
Buying Guide
Confirm True Dual-Display Support on macOS
This is the single most important check. Many USB-C hubs advertise dual HDMI outputs, but on Macs those outputs mirror the same image rather than extending your desktop. That’s a limitation of how macOS routes display data over DisplayPort Alt Mode from a single port. Before buying, compare what the hub promises with your Air’s chip: single-cable dual-HDMI hubs, including the compact picks above, typically mirror the second screen on macOS, and M1 and M2 Airs support only one external display natively.
Match the Charging Wattage to Your Laptop
Pass-through charging matters more than most buyers expect. Your hub shares its power delivery with attached peripherals, and if the PD port only offers 60W, a 13-inch MacBook Air may charge slowly or drain during heavy use. Look for 85W–100W PD pass-through — the LIONWEI’s 100W port is the standout here, leaving full headroom even with monitors and drives drawing power. If you use a higher-wattage charger, check the hub’s maximum pass-through so you’re not bottlenecking it.
Count Your Ports Before You Buy
List every device on your desk: two monitors, keyboard, mouse, webcam, external SSD, SD cards from your camera, maybe Ethernet. Then add one port of headroom. A 4-in-1 hub looks cheap until you’re swapping cables daily. The 13-in-1 option justifies itself for permanent desk setups, while a compact 8-in-1 suits people who dock and undock often. Also check physical spacing — some hubs cram USB-A ports so tightly that wide thumb drives block adjacent ports, and a captive cable of 8–12 inches is long enough to position the hub but short enough to stay tidy.
Know Your MacBook Air’s Display Limit First
The single biggest reason dual-monitor setups fail on a MacBook Air is the chip, not the hub. Apple sets a hard limit on how many external displays each model can drive natively, and no single-cable HDMI hub can raise it. Check About This Mac before you buy anything.
| MacBook Air model | Native external displays | What works for two monitors |
|---|---|---|
| Intel models (2018-2020) | Up to two 4K displays, or one higher-resolution display | Two separate USB-C/Thunderbolt connections or a Thunderbolt dock |
| M1 and M2 | One | DisplayLink dock or adapter for the second screen |
| M3 | Two, but only with the laptop lid closed | Thunderbolt/USB4 dock or dual-cable hub in clamshell mode; DisplayLink to keep the lid open |
| M4 and later | Two, with the lid open | Thunderbolt/USB4 dock, dual-cable hub or DisplayLink |
Native, MST and DisplayLink: Three Ways a Hub Drives Two Screens
Native video over Thunderbolt or USB4: The Mac’s graphics hardware drives each display directly, either through two cables or through a Thunderbolt or USB4 dock that carries two separate video streams. This gives the best image quality, no driver and full support for protected streaming content, but it only works up to the Mac’s native display limit.
MST (Multi-Stream Transport): Many inexpensive dual-HDMI hubs split one DisplayPort signal into two using MST. Windows supports MST, but macOS does not, so on a Mac both monitors usually show the same mirrored image. If a single-cable hub’s listing says “extended on Windows, mirrored on Mac,” this is why.
DisplayLink: A dedicated chip in the dock receives compressed video over USB and drives the monitors itself. It ignores the Mac’s native display limit, which is why it rescues M1 and M2 Airs. The trade-offs are a required driver, some extra CPU load, occasional lag with fast motion and possible blocks on protected streaming video.
Some hubs avoid the single-port limitation by using two USB-C plugs that occupy both of the Air’s ports. On an M3 Air with the lid closed or an M4 or later Air, those can provide two native extended screens; on an M1 or M2 Air, only one of the two outputs will extend.
Comparison of the Additional Docks
| Dock | Display method | Max monitors via dock on MacBook Air | Laptop charging | Ethernet | Price tier |
|---|---|---|---|---|---|
| Plugable TBT-UDM | Native Thunderbolt 4 | Two on M4 and later; two on M3 lid closed; one on M1/M2 | 96W certified | Gigabit | Premium |
| UGREEN 11-in-1 USB4 | Native USB4 | Two on M4 and later; one on M1/M2 | Up to 115W (charger not included) | 2.5GbE | Mid-range |
| UGREEN Revodok Pro 209 (CM615) | DisplayLink | Two on any Apple Silicon Air | Up to 100W (charger not included) | Gigabit | Mid-range |
| WAVLINK DisplayLink dual 4K | DisplayLink | Two on any Apple Silicon Air | 100W | Yes | Mid-range |
| Kensington SD4750P | DisplayLink | Two on any Apple Silicon Air | 85W (power adapter included) | Gigabit | Mid-range |
| CalDigit TS4 | Native Thunderbolt 4 | Two on M4 and later; one on M1/M2 | 98W | 2.5GbE | Premium |
Setup Tips for a Smooth Dual-Monitor Desk
- Install the driver first for DisplayLink docks. Download DisplayLink Manager from the official Synaptics site, install it, then grant Screen and System Audio Recording permission in System Settings under Privacy & Security. Without that permission, the external screens stay black.
- Arrange the displays in macOS. Open System Settings, then Displays, and choose Extended for each monitor. Drag the screen icons so their positions match your desk, and set which screen holds the menu bar.
- Use certified cables. A cheap HDMI cable can limit a 4K display to 30Hz. Use High Speed HDMI or better for 4K 60Hz, and a proper Thunderbolt or USB4 cable for docks that do not have an attached cable.
- Connect the charger to the dock, not the laptop. Let the dock pass power through, and use a charger strong enough to cover the dock’s own needs plus the laptop’s charging.
- Keep firmware and macOS current. Dock makers fix wake-from-sleep and display detection issues through firmware and driver updates, and macOS updates occasionally change external display behavior.
- Give the dock air. Hubs and docks warm up when charging and driving two displays. Keep them off soft surfaces and out from under papers so they do not throttle or disconnect.
Troubleshooting Common Problems
- Both monitors show the same image: The hub is using MST or the Mac has reached its native limit. Check your chip against the table above, or switch to a DisplayLink or dual-cable solution.
- Second monitor stays black on an M3 Air: Close the lid with an external keyboard and mouse connected; M3 Airs only enable the second external screen in clamshell mode.
- Screens flicker or drop when waking from sleep: Update the dock firmware, try a different cable and avoid daisy-chaining extra adapters between the dock and monitor.
- Battery drains while plugged in: The charger is too weak for the dock plus laptop. Use a higher-wattage USB-C charger on the dock’s power input.
Decode USB Speeds and Port Labels
Hub listings use a confusing mix of names for the same speeds. Knowing them helps you avoid paying for ports that bottleneck your drives.
- USB 3.0, USB 3.1 Gen 1, USB 3.2 Gen 1, 5Gbps: All the same speed. Fine for keyboards, mice, webcams, printers and most USB flash drives.
- USB 3.1 Gen 2, USB 3.2 Gen 2, 10Gbps: Twice as fast, and worth having if you use an external NVMe SSD for photo libraries or video projects.
- USB4 and Thunderbolt 4, 40Gbps: Shared between video, data and other devices on the dock. This bandwidth is why Thunderbolt and USB4 docks can carry two native video streams and fast storage at the same time.
- UHS-I versus UHS-II card readers: UHS-II readers move files from fast camera cards much more quickly, which matters for photographers emptying large cards every day.
Work Out Your Power Budget
A dock’s charging rating is the most it can send to the laptop, but the dock also needs power for itself and for connected devices. A practical check is simple: add the laptop’s charging needs, the dock’s own overhead and any bus-powered devices such as portable SSDs, then make sure your charger covers the total with some margin. A MacBook Air charges fine from 30W to 70W chargers, so any dock passing 85W or more will not hold it back, as long as the charger feeding the dock is strong enough. Docks that do not include a power adapter, like several UGREEN models, need a quality USB-C charger at or above the rated input to deliver their full charging figure.
Cable Length, Placement and Heat
Short attached cables keep travel hubs tidy but can force the hub to dangle off the desk edge. For a permanent setup, a dock with a detachable cable of around three feet lets you hide it behind a monitor or under a riser. Docks that carry two displays and charging generate warmth, so keep them in open air; aluminum shells help spread heat, but they still need space around them to avoid throttling or random disconnects.
Our Verdict
Among the compact hubs, the MOKiN is the pick for most MacBook Air owners: it keeps your laptop charging and adds two HDMI outputs at a budget price, though true extended dual screens depend on your Air’s chip, so M1 and M2 owners should look at a DisplayLink dock and M4 or later owners at a Thunderbolt or USB4 dock. If you want maximum ports for a permanent workstation, step up to the 13-in-1 hub and never think about cable swapping again. Anker’s 8-in-1 is the choice for buyers who value proven reliability and support over raw specs. And if you just need a functional dual-HDMI dock for a secondary desk, the budget LIONWEI covers the essentials for far less — no other hub here comes close on value.
FAQ
Can a MacBook Air really run two external monitors through one hub?
Yes, provided the hub is designed for it. Older Intel MacBook Airs generally support two external displays plus the built-in screen, while some Apple Silicon models have stricter display limits depending on the chip generation. The hub itself must support extended (not just mirrored) dual output on macOS, which in practice means a DisplayLink dock on M1 and M2 Airs or a Thunderbolt or USB4 dock on M4 and later Airs.
Will a USB-C hub slow down my monitors or transfers?
At 4K resolution at standard 60Hz refresh rates, a good hub drives two displays without visible lag for office work, browsing, and media. If you push very high resolutions or refresh rates on both displays simultaneously, bandwidth gets tight. Data transfers over USB 3.0 ports top out around 5Gbps, which is plenty for external drives and card readers but not a substitute for Thunderbolt speeds.
Do I need to plug in a separate charger when using one of these hubs?
You should, yes. All four hubs include a USB-C PD pass-through port where your charger connects; the hub then charges the laptop while powering its own ports. Without a charger attached, running two 4K monitors plus peripherals will drain your Air’s battery quickly. A 65W–100W USB-C charger is the sweet spot.
Are cheap hubs like the LIONWEI safe for my MacBook?
A well-reviewed budget hub with proper PD pass-through is safe for your machine — pass-through charging negotiates power with your laptop’s own charging circuitry, so a 100W port won’t push power your Air can’t accept. The realistic trade-offs with budget hubs are in build quality, long-term durability, and support, not safety. Buy from sellers with solid return policies, and you’re not risking much at this budget tier.
Why do my two monitors mirror instead of extend on my MacBook Air?
Most single-cable dual-HDMI hubs use MST to split one video signal into two, and macOS does not support MST extended mode. The result is the same picture on both screens. On an M1 or M2 Air the chip also supports only one external display natively. A DisplayLink dock, or a Thunderbolt or USB4 dock on an M4 or later Air, solves the problem.
Is DisplayLink good enough for everyday work?
Yes, for office work, browsing, coding, spreadsheets and video calls, DisplayLink screens feel very similar to native ones. It is less suitable for fast games, color-critical editing and some protected streaming services, which may block playback on DisplayLink outputs. Keep the driver updated after each macOS update.
Can I use a Thunderbolt dock with a MacBook Air?
Yes. Apple Silicon MacBook Airs have Thunderbolt or USB4 ports that work with Thunderbolt 4 and USB4 docks. The dock will run as many native displays as the Air supports: one on M1 and M2 models, two with the lid closed on M3 models, and two with the lid open on M4 and later models.
What resolution can I run on two external monitors?
Two 4K displays at 60Hz is a realistic target for M4 and later Airs through a good Thunderbolt or USB4 dock, and for most DisplayLink docks rated for dual 4K. Inexpensive hubs may limit one or both outputs to 30Hz at 4K, which makes cursor movement feel sluggish, so check the per-port refresh rate in the specifications.
Do I need a powered dock or is a bus-powered hub enough?
A bus-powered hub draws its power from the laptop and is fine for travel with a single display. For two monitors, external drives and charging, choose a dock that accepts a charger or includes a power supply, so the laptop charges reliably while everything runs.
Can I close my MacBook Air and use only the external monitors?
Yes. Clamshell mode works on all recent MacBook Air models when the laptop is connected to power and an external keyboard and mouse or trackpad. On M3 Airs, closing the lid is actually required to enable a second external display. Keep the laptop on a vertical stand or open surface so it can shed heat while closed.
Will a dock work with my next laptop?
Thunderbolt 4, USB4 and DisplayLink docks are broadly compatible with Windows laptops and newer Macs, which makes them good long-term purchases. Cheap MST hubs behave differently on each platform. If you expect to switch to a MacBook Pro or a Windows laptop, a Thunderbolt or DisplayLink dock carries over most smoothly.


