
A mini PC or NUC is small enough to sit on the desk, but that wastes precious surface area and leaves a box and its cables in view. Mounting it under the desk clears the top, hides the cabling, and keeps the little machine cool and out of the way. The trick is choosing a mount that fits your specific mini PC and desktop, because these tiny computers vary a lot in size and mounting options.
Our Top Picks
 bylitco Under Desk Laptop/Mini PC Storage Mount8.32 cubic inches1.6 x 2 x 2.7 inches0.8 PoundsCheck on Amazon


Top 3 picks at a glance
Quick answer: which mount fits your mini PC
- Mini PC with VESA holes or a VESA plate: a VESA bracket or a replacement plate such as the GinTai NUC bracket for the most secure, lowest-profile install.
- Mini PC without VESA holes: an adjustable clamp bracket such as the HumanCentric or StarTech ACCSMNT, or one of the adjustable cradles in the picks below.
- Mac mini from 2024 onward: a model-specific mount such as the TotalMount (metal-free, Wi-Fi friendly), HIDEit (steel) or Monzlteck (value steel).
- Mini PC plus a dock, drive or hub: an under-desk tray or shelf with room for accessories.
Whichever you choose, measure the machine and your desk thickness, keep the vents and power button accessible, and route the cables up over the back edge.
The three ways to mount a mini PC underneath
There are three common approaches. A VESA bracket uses the 75×75 or 100×100 mm holes many mini PCs and NUCs include, letting you screw the machine to a plate that mounts under the desk, which is the most secure option. An adjustable clamp cradle grips the mini PC between padded arms and screws or clamps to the underside, working even for machines without VESA holes. A simple under-desk shelf or tray holds the PC plus a small hub or drive, useful when you want to stash more than just the computer.
As an Amazon Associate we earn from qualifying purchases at no extra cost to you.

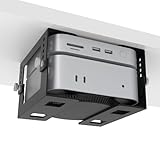


Match the mount to the machine
| Mount type | Fits | Security | Price tier |
|---|---|---|---|
| VESA bracket | PCs with VESA holes | High | Budget |
| Clamp cradle | Almost any mini PC | High | Budget |
| Under-desk tray | PC + accessories | Moderate | Budget to mid-range |
| Adhesive holder | Very light PCs | Low-moderate | Budget |
More under-desk mini PC mounts worth considering
The eight picks above are mostly adjustable cradles and trays. If you want a bracket from an established brand, a mount shaped exactly for the current Mac mini, or a simple VESA plate for a NUC, these six options fill the gaps. They are grouped from universal to model-specific.
HumanCentric Thin Client Mount Bracket
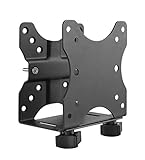
HumanCentric’s thin client bracket is a long-standing universal option that works under a desk, behind a monitor or on a monitor-arm pole. Instead of a fixed cradle, it uses an adjustable clamp that closes around the device, so it fits machines that have no VESA holes and that change between upgrades.
HumanCentric lists an adjustable device thickness range of about 0.65 to 2.55 inches, support for up to about 11 lb (5 kg), and 75×75 or 100x100mm VESA compatibility. Hardware for all three mounting styles comes in the box, along with silicone strips to protect the device’s finish. It is aimed at mini computers, Chromeboxes, Mac minis, thin clients, USB docks and hubs. One caveat from the maker: it only suits some Intel NUC models, specifically those with the power button on the side, since the clamp covers the top and bottom.
Strengths: very flexible device range, metal construction, three mounting options and a weight rating far beyond any mini PC.
Drawbacks: the clamp design can block buttons or vents on some machines, so check where your power button and air intakes sit. Larger 1-liter business PCs thicker than about 2.5 inches will not fit.
Compared with the adjustable cradles above, it is more compact and doubles as a behind-the-monitor mount if you change your setup later.
Setup notes: mount the bracket to the underside of the desk first, then slide the computer in and close the clamp until the silicone strips grip without squeezing. Orient the machine so its exhaust faces the open room rather than the desk’s modesty panel. Because the bracket also accepts a VESA pattern, you can later move the whole assembly behind a monitor or onto an arm pole without buying anything else, which is handy if you rearrange the desk or switch to a standing frame. It is a good fit for USB docks too, so one bracket can hold a dock beside the computer.
StarTech.com Thin Client Mount (ACCSMNT)
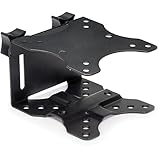
StarTech’s ACCSMNT is the business-grade sibling of the HumanCentric bracket, with a slightly wider range and a longer warranty. It suits office and IT deployments, but it is equally good for a home gaming desk with a mini PC or dock.
StarTech’s specs: adjustable width from about 0.7 to 2.8 inches (17 to 70 mm), up to 11 lb (5 kg), and 75×75 or 100x100mm VESA. It mounts behind a monitor, on a monitor-mount pole, under a desk or on a wall. An adjustable strap holds the device in place, rubber pads handle devices with non-parallel sides, and an open-frame design keeps ports accessible. The steel and plastic bracket comes with a five-year warranty.
Strengths: fits slightly thicker devices than the HumanCentric, includes a strap for extra security, and the open frame helps airflow and cable access.
Drawbacks: the strap and pads take a little fiddling to get right, and like all clamp brackets it may sit over side vents on some machines.
Pick this one if your mini PC is close to 2.6 to 2.8 inches thick, or if you want the longest warranty in this group.
Setup notes: the strap is the key to a rattle-free install. Thread it around the computer after closing the bracket, pull it snug, and add the included pads where the device’s sides taper. Under a desk, place the open side of the frame toward you so the front ports stay reachable. The pole-mount hardware is useful on dual-arm monitor stands, where the computer can sit on the center pole behind the screens and keep cable runs short. For a 1-liter business PC near the top of the width range, measure carefully, as the strap and pads take up a few millimeters.
TotalMount for Mac mini (2024 and Later)
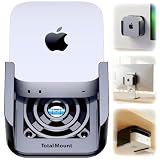
Innovelis’ TotalMount is made specifically for the redesigned Mac mini released from late 2024 onward. Its two standout features are metal-free construction and ventilation channels. Because it contains no metal, it does not block the Mac mini’s Wi-Fi and Bluetooth antennas, which matters more under a desk where wood, steel frames and cable trays already weaken signals.
From the listing: it fits Mac mini models from 2024 onward and not older models; it includes desk screws and rubber bumpers for under-desk installation, special wall screws that need no drill or anchors, and straps for mounting to a monitor without VESA holes. The glossy piano-black resin body has patented ventilation channels so cool air can reach the computer. Innovelis backs it with a two-year guarantee.
Strengths: Wi-Fi-safe design, cooling channels, three mounting options and a precise fit for the current Mac mini.
Drawbacks: it only fits the current Mac mini design, so it will not carry over to a Windows mini PC later. The resin body is lighter-duty than steel brackets, though the Mac mini itself is light.
For a Mac mini on a desk that relies on wireless connections, this is the safest choice for signal strength.
Setup notes: position the mount near the front or side edge of the desk rather than deep under the center, both for better wireless reception and easier access to the front USB-C ports and headphone jack. Because the current Mac mini’s power button sits on its underside, check that the mount leaves it reachable in your chosen orientation before driving in the screws. If you use a monitor without VESA holes, the strap option keeps the computer behind the screen instead. Owners who later move to a non-Apple mini PC will need a different mount, so treat this as a Mac-only purchase.
HIDEit Mac mini Mount (M4-Generation Design)

HIDEit makes some of the best-known Mac mini mounts, and its current model is designed for the smaller Mac mini introduced in 2024. The listing also claims compatibility with later Mac mini models; confirm the fit for your exact model on the product page.
HIDEit describes the mount as 16-gauge cold-rolled steel with a black powder coat, offering wall, under-desk and VESA mounting with 75 and 100mm patterns. A full-wrap design cradles the Mac mini, and an offset shape holds it slightly away from the mounting surface for ventilation. Ports and controls remain accessible, and mounting hardware is included. HIDEit notes that shorter screws may be needed for thin desks.
Strengths: tough steel construction, a tailored fit, airflow-aware design and a clean, minimal look under the desk.
Drawbacks: steel can reduce wireless signal slightly compared with a metal-free mount, and it is specific to the current Mac mini shape. The older HIDEit MiniU fits 2010 to 2023 Mac minis instead, so do not mix the two up.
Choose HIDEit over TotalMount if you prefer steel and a wired Ethernet connection, which makes antenna shielding irrelevant.
Setup notes: measure your desktop’s thickness before you start, since HIDEit points out that thin desks may need shorter screws than the ones supplied. Attach the bracket, then slide the Mac mini into the wrap so its front ports face you. The offset design leaves a gap for air, but avoid tucking it against a wall or modesty panel that blocks the rear exhaust. If you mainly use Wi-Fi and notice weaker signal after installation, moving the mount closer to the desk edge or adding wired Ethernet usually solves it. The VESA pattern also lets you move it behind a monitor later.
Monzlteck Mac mini Under Desk/Wall/VESA Mount

Monzlteck’s bracket is a budget-tier steel mount sized for the current Mac mini, with a twist: it also works as a VESA monitor mount, so the same bracket can hold the Mac mini and attach to a monitor arm or the back of a monitor.
The listing describes a steel frame rated for about 10 lb with reinforced joints and a rust-resistant finish, VESA support from 75×75 to 100x100mm, and soft silicone pads to protect the Mac mini and the mounting surface. Screws, wall anchors, spacers and hex tools are included, and the Mac mini can be mounted vertically or horizontally. Newer listings describe compatibility with later Mac mini Pro models as well.
Strengths: budget-friendly, sturdy steel, flexible mounting positions and a complete hardware kit.
Drawbacks: installation under a desk or on a wall requires drilling, and the steel frame has the same mild wireless-signal trade-off as other metal brackets. It is sized for the Mac mini, not universal mini PCs.
It is the value alternative to the HIDEit if you mainly want a secure steel cradle for a Mac mini.
Setup notes: decide on horizontal or vertical orientation before drilling, as it changes where the screw holes go and how the cables exit. The included spacers help hold the bracket slightly off the desk for airflow, and the hex tools make tightening easy in tight spaces. If you plan to use the VESA side to hang a monitor arm or attach the bracket behind a screen, confirm the monitor’s VESA pattern matches 75 or 100mm. Keep the silicone pads in place, since they also reduce vibration noise if the desk is bumped.
GinTai VESA Mount Bracket for Intel NUC
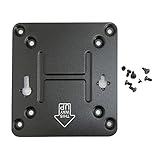
Many Intel NUCs shipped with a small VESA plate that is easy to lose. GinTai’s bracket is a replacement: an alloy steel and aluminum plate that bolts to a 75×75 or 100x100mm VESA pattern and lets the NUC hang from it using the screw posts on the bottom of the computer. The same plate can be screwed to the underside of a desk instead of a monitor.
From the listing: it weighs about 0.12 kg, includes eight screws, and suits NUC generations 4, 5, 6, 7, 8, 10, 11 and newer listings add the 13th generation. It does not fit the Skull Canyon or Hades Canyon NUCs. Installation takes a couple of minutes with a screwdriver. Note that Intel handed its NUC line to ASUS in 2023, so newer ASUS-branded NUC models may use different hardware; check compatibility before buying for a recent machine.
Strengths: the lowest-profile, most secure option for a compatible NUC, very light, and inexpensive.
Drawbacks: it only works with NUCs that accept this style of plate, and the NUC hangs flush to the desk, so plan for airflow and access to the front ports.
If you own a supported NUC, this plate is the simplest and most secure way to get it under the desk.
Setup notes: screw the plate to the desk’s underside with the hanging slots oriented so the NUC slides toward the front edge to lock in, which keeps the front ports facing you. Then fit the included screws into the NUC’s bottom screw holes and hang the computer on the plate. Leave clearance on the sides for the intake vents, and avoid mounting directly above a heater or right against a radiator. If your NUC came with its original plate, compare it with this one first, since you may not need a replacement at all.
Under-desk mount comparison
| Mount | Type | Fits | Rated load | Material | Price tier | Best for |
|---|---|---|---|---|---|---|
| HumanCentric Thin Client | Adjustable clamp bracket | Devices about 0.65 to 2.55 in thick | 11 lb | Metal | Budget to mid-range | Universal use, behind-monitor option |
| StarTech ACCSMNT | Adjustable clamp bracket with strap | Devices about 0.7 to 2.8 in wide | 11 lb | Steel and plastic | Mid-range | Thicker mini PCs, long warranty |
| TotalMount | Model-specific cradle | Mac mini 2024 and later | Not listed | Metal-free resin | Budget to mid-range | Wi-Fi-dependent Mac mini |
| HIDEit Mac mini Mount | Model-specific wrap bracket | Current Mac mini design | Not listed | Cold-rolled steel | Mid-range | Durable, clean Mac mini install |
| Monzlteck | Model-specific bracket plus VESA | Current Mac mini design | 10 lb | Steel | Budget | Value Mac mini mount |
| GinTai NUC Plate | VESA plate | Supported Intel NUC generations | Not listed | Alloy steel and aluminum | Budget | NUC owners missing the stock plate |
Measure before you buy
Check three numbers: the mini PC’s width and height (for a clamp cradle’s adjustment range), whether it has VESA holes and which size, and your desktop’s thickness (for any screw or clamp mount). Leave clearance for the vents; mini PCs pull cool air from the sides or bottom, so do not sandwich the intake against the desk. Orient the machine so its fan and vents stay clear, and route the power and video cables up over the rear edge into a cable clip so nothing dangles.
Cooling and access
Under-desk mounting is actually good for temperatures because the box is not trapped behind a monitor, but only if air can move. Keep a couple of centimeters around the vents. Also think about access: if you frequently plug in USB drives or headphones on the front, mount the PC toward the front edge or on a tray you can reach, rather than deep under the desk where the ports are a stretch away. A clamp cradle that tilts makes reaching rear ports easier during setup.
How to choose an under-desk mini PC mount
The measurements above decide what physically fits. These criteria decide what works well over years of daily use.
1. Universal or model-specific?
Model-specific mounts, such as those made for the Mac mini, fit snugly, look cleanest and often include airflow features tailored to that machine. Universal clamps and cradles adapt to almost any mini PC and survive an upgrade to a different brand. If you change machines every few years, a universal mount saves buying again.
2. Material and wireless signal
Steel brackets are strong and durable, but metal near a computer’s antennas can weaken Wi-Fi and Bluetooth, and the underside of a desk is already a poor spot for signal. If you rely on wireless networking, wireless peripherals or a Bluetooth controller, consider a metal-free mount, a USB extension for a wireless receiver brought up to the desk surface, or a wired Ethernet connection.
3. Airflow design
Look for open frames, offset designs that hold the machine away from the desk, or ventilation channels. Avoid mounts that cover the machine’s intake or exhaust vents. Remember that many mini PCs pull air in from the bottom or sides and push it out the back.
4. Button and port access
Check where the power button and front ports are. Some current machines have the power button on the underside, and a clamp or cradle can cover it. Mounting so the button side faces outward, or using an open-frame mount, avoids reaching blind under the desk every morning.
5. Installation method
Most under-desk mounts screw into the underside of the desk. Make sure the screws are shorter than the desktop’s thickness, and check whether your desk is solid wood, particleboard or a hollow-core panel. Adhesive mounts avoid drilling but are only suitable for very light devices and can let go over time, especially in warm rooms.
6. Security
In offices, shared spaces or dorms, consider a mount with a lock option or a design that hides screws once the computer is in place. A cable lock slot on the computer combined with a bracket that blocks removal deters casual theft.
Common mini PC sizes and suitable mounts
| Machine type | Approximate size | Suitable mount types | Notes |
|---|---|---|---|
| 4×4-inch NUC-style mini PCs | About 4.5 x 4.5 in footprint, 1.5 to 2 in tall | VESA plate, clamp bracket, small cradle | Many include VESA plates; check button placement for clamp brackets |
| Mac mini (2024 and later) | About 5 x 5 in footprint, 2 in tall | Model-specific cradle, adjustable cradle | Power button on the underside; leave it reachable |
| Mac mini (2010 to 2023) | About 7.7 x 7.7 in footprint, 1.4 in tall | Model-specific bracket for older minis, wide cradle | Older mounts do not fit the newer, smaller Mac mini |
| 1-liter business mini PCs | About 7 x 7 in footprint, 1.4 in tall | Model-specific bracket, wide adjustable cradle, tray | Brand-specific brackets often use the machine’s own screw points |
| Larger gaming mini PCs | Varies widely, some well over 2 in tall | Wide adjustable cradle, under-desk shelf | Check weight and depth; small clamps will not fit |
Step-by-step installation
- Plan the position. Sit at the desk and decide where the computer can go without hitting your knees, chair arms or a keyboard tray. Toward the back corner is usually safest; toward the front edge is easier for ports.
- Check desk construction. Look underneath for frames, crossbars, drawers and the desk’s thickness. Avoid mounting into hollow-core panels with short screws.
- Dry-fit with cables. Hold the computer and mount in place with the power and display cables attached, and confirm the cables reach without strain.
- Mark and pre-drill. Use the mount or the included template to mark the holes. Pre-drill small pilot holes, taking care not to drill through the desktop.
- Attach the mount. Screw the mount in firmly, but do not overtighten into particleboard, which strips easily.
- Insert and secure the computer. Slide it into the cradle or attach it to the plate, then tighten any straps or clamps. Check that vents are clear and the power button is reachable.
- Route and secure the cables. Bundle the cables, clip them to the underside, and run them up over the back edge or through a grommet so nothing hangs where your feet go.
- Bring wireless and ports up. If needed, add a short USB extension or hub on the desk surface for wireless receivers, flash drives and headphones.
Desk types and special cases
- Standing desks: mount the computer to the desktop rather than the frame or the floor, so it moves with the desk, and leave enough cable slack for full height travel. Make sure the mount does not collide with the frame’s crossbar or motor housing.
- Glass desks: do not drill glass. Use a clamp-on under-desk tray, a mount attached to the desk’s metal frame, or a behind-the-monitor VESA mount instead.
- Metal desk frames: some frames have pre-drilled holes or channels where a bracket can bolt on. This avoids drilling the desktop and keeps the computer well supported.
- Desks with a keyboard tray: mount the computer clear of the tray’s travel path, usually at the side or back.
- Thin desktops: desks around 15 mm thick need short screws. If the included screws are too long, use shorter wood screws of the same diameter.
Common mistakes to avoid
- Covering the vents. Pressing an intake flat against the desk or wrapping the machine in a tight cradle raises temperatures.
- Burying the power button. Mounting with the button facing the desk or the wall means groping underneath every time you switch on.
- Screws that are too long. A screw longer than the desktop’s thickness can poke through the top surface.
- Letting cables carry the weight. Cables should never support the computer. Secure the machine first, then add cables with slack.
- Ignoring wireless signal. Under-desk placement plus a steel mount can noticeably weaken Wi-Fi. Test the connection before finalizing the position.
- Mounting where knees hit it. Check clearance in your normal sitting position, including when you cross your legs or lean back.
Managing the power brick and cables
A mini PC is small, but its cables and power adapter often take up more space than the computer. Planning them is what makes an under-desk install look clean.
- Mount the power brick too. Many mini PCs use an external power adapter. Fix it to the underside of the desk with a hook-and-loop strap, a small bracket or an under-desk cable tray so it does not dangle from the cable or sit on the floor collecting dust.
- Use an under-desk cable tray. A tray or basket along the back edge holds the power strip, adapters and surplus cable length, keeping everything off the floor and away from feet and chair wheels.
- Choose sensible cable lengths. Under-desk placement often needs slightly longer display and USB cables than a desktop setup. Buy the length you need with a little slack, rather than very long cables that create loops.
- Label the ends. When everything is out of sight, small labels on each cable save time when you swap a monitor or troubleshoot.
- Add a desk-level hub. A USB hub or dock on the desk surface gives you front-facing ports for drives, headsets and wireless receivers without reaching under the desk.
- Leave a service loop. Keep a little extra cable at the computer end so you can slide the machine out of its mount for cleaning or upgrades without disconnecting everything.
Cooling and noise in more detail
Mini PCs pack laptop-class or desktop-class chips into tiny cases, so their fans work hard under load. Under-desk mounting can help or hurt depending on the details.
- Know the airflow path. Look at your machine’s vents: many pull air in from the bottom or sides and exhaust from the back. Keep at least a couple of centimeters of clearance at the intake and avoid pointing the exhaust at a wall, modesty panel or cable bundle.
- Avoid heat sources. Do not mount directly above a heater, next to a radiator, or beside a power strip loaded with warm adapters.
- Clean periodically. Dust collects faster near the floor. Check the intake every few months and clear it with a soft brush or short bursts of compressed air while the machine is off.
- Noise can drop. Moving a mini PC from the desk surface to underneath often makes its fan less noticeable, because the desktop sits between the fan and your ears.
- Watch for vibration. Pads and padded cradles absorb fan vibration that might otherwise resonate through a thin desktop.
Under the desk, behind the monitor or on the desk?
| Location | Desk space freed | Port access | Cooling | Wireless signal | Best for |
|---|---|---|---|---|---|
| Under the desk | All of it | Fair; needs a desk-level hub for frequent use | Good with clear vents | Can weaken, especially with metal mounts or frames | Cleanest look, quiet operation |
| Behind the monitor (VESA) | All of it | Fair to good | Can trap heat against the monitor | Good, sits high | Short cable runs, desks you cannot drill |
| On a monitor arm pole | All of it | Good | Good | Good | Dual-arm setups with a central pole |
| On the desk | None | Best | Good | Best | Frequent port use, temporary setups |
Frequently asked questions
Will mounting my mini PC under the desk make it run hotter?
No, usually the opposite, as long as the vents have clearance. Under the desk the machine sits in open air rather than baking behind a monitor. Just avoid pressing the intake flat against the desktop and leave a small gap around the sides.
What if my mini PC has no VESA mounting holes?
Use an adjustable clamp cradle, which grips the machine between padded arms and needs no built-in holes. Measure the PC’s dimensions and buy a cradle whose range covers them; it holds securely and fits nearly any small form factor.
Will an under-desk mount weaken my mini PC’s Wi-Fi?
It can. The underside of a desk, especially near a metal frame or steel bracket, blocks some wireless signal. If you notice slower Wi-Fi or Bluetooth dropouts, try a metal-free mount, move the computer toward the desk edge, add a short USB extension for wireless receivers, or switch to wired Ethernet.
Can I mount a Mac mini upside down or vertically?
Many Mac mini mounts support horizontal and vertical orientations, and some hold the computer upside down under the desk. Whichever orientation you choose, keep the air intake and exhaust clear and make sure you can still reach the power button, which sits on the underside of the 2024 and later Mac mini.
Do I need to drill into my desk?
Most secure under-desk mounts screw into the desktop, so a few small pilot holes are normal. If you cannot drill, consider a mount that attaches to the desk frame, a clamp-on tray, or a VESA bracket that mounts the computer behind your monitor instead.
What is the safest weight rating for a mini PC mount?
Most mini PCs weigh between about 1 and 3 lb, and typical brackets are rated for 10 lb or more, so weight is rarely the limit. Leave extra margin if you also hang a dock, external drive or power brick on the same mount.
Can I mount a mini PC behind my monitor instead?
Yes, if your monitor or monitor arm has VESA holes. Many under-desk brackets also mount behind a monitor using the VESA pattern. This keeps ports closer to hand, but it can trap heat between the monitor and the computer, so leave a gap for airflow.
Is an adhesive mini PC mount safe?
Only for very light devices and only if you accept some risk. Adhesive can soften in warm rooms or loosen from textured, dusty or particleboard surfaces, and a fall can damage the computer. Screw-in mounts are far more reliable for anything you would not want to drop.
How do I mount a mini PC on a standing desk?
Attach the mount to the desktop itself so the computer moves up and down with it, and leave enough cable slack for the desk’s full height range. Keep the mount clear of the frame’s crossbar and motors, and secure the power brick to the desktop too so it does not swing as the desk moves.
When is under-desk mounting a bad idea?
Skip it if you plug and unplug devices on the front ports many times a day and do not want a desk-level hub, if your desk is glass or a thin hollow-core panel with no frame to attach to, or if your home relies on weak Wi-Fi and you cannot run Ethernet. In those cases, a behind-the-monitor VESA mount or a small vertical stand on the desk is the better compromise. Gaming mini PCs with very large power bricks and heavy cooling may also be easier to live with on a shelf than hanging under a desk.
How often should I clean an under-desk mini PC?
Check the vents every few months. Machines near the floor, in carpeted rooms or in homes with pets collect dust faster. Turn the computer off, then clear the intake with a soft brush or short bursts of compressed air.
Bottom line
Pick a VESA bracket if your mini PC has the holes for the most secure fit, a clamp cradle if it does not, or a tray if you want to stash accessories alongside it. Measure the machine and your desktop thickness, keep the vents clear for airflow, and route cables over the back edge. Mounted right, a NUC-sized PC frees your whole desktop and can run cooler than it would tucked behind a monitor.


