
Scroll through any desk setup photo and you’ll notice two lighting tricks showing up again and again: a slim bar sitting on top of the monitor washing light backward onto the wall, and an LED strip hidden behind the panel’s edges creating a soft halo. Both reduce eye strain, both look great in photos, and both cost less than a nice desk lamp — but they solve slightly different problems. The real decision isn’t which one is “better.” It’s which one fits your monitor, your room, and how much you like fiddling with apps.
A light bar mounts on top of your monitor and throws light down onto your desk surface and, on many models, backward onto the wall behind it. A bias lighting strip mounts behind the screen and lights only the wall. One is a task light and ambient light hybrid; the other is purely ambient. Here’s how they stack up.
As an Amazon Associate we earn from qualifying purchases at no extra cost to you. Product prices and availability are accurate as of the date shown and are subject to change.


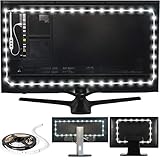

Top 3 picks at a glance
Quick Verdict
Get an RGB light bar if: you work at your desk after dark, want adjustable task lighting without glare, or game in a room where you also want reactive color effects. Most quality bars run $30–$60.
Get a bias lighting strip if: you mostly watch movies or game at night, want the cheapest possible eye-comfort upgrade, or rent and need something removable in ten seconds. Strips start around $13 and rarely exceed $60 even with all the smart features.
For most desk workers, the light bar is the more versatile buy. For most TV-and-movie viewers, the strip wins on value.
Side by Side
| Factor | RGB Light Bar | Bias Lighting Strip |
|---|---|---|
| Eye comfort method | Lights the desk and reduces screen-to-surroundings contrast; some light washes the wall too | Lights only the wall behind the screen, easing pupil strain in dark rooms |
| Task lighting | Yes — many bars include a forward white light at 500–1,000 lux on the desk | No — purely ambient |
| Price range | $25–$60 for most desk-sized models | $10–$35 basic; $30–$60 for camera-reactive versions |
| Installation | Counterweight clip sits on the monitor bezel; no adhesive | Adhesive backing on the rear panel; peel and stick |
| Space needed | Needs 2–3 inches of clear bezel depth and a flat top edge | Fits any monitor or TV with rear access; needs 1–2 inches of wall gap |
| Durability | Solid housing, typically 25,000–30,000 rated hours; sensitive to knocks | 50,000-hour rated LEDs, but adhesive can fail in warm rooms |
| Maintenance | Dust the housing monthly; nothing else | Re-stick edges if adhesive peels; no moving parts |
| Look | Visible hardware — a design element on top of the screen | Invisible fixture; only the glow shows |
| Resale/portability | Moves between monitors in seconds, holds value well | Removing adhesive strips often kills the backing; treat as single-install |
| Best for | Desk workers, gamers, anyone who needs light on the desk | Movie watchers, dark-room gaming, minimal setups |
Where an RGB Light Bar Wins
You get two lights in one. A bar like the Govee Smart Light Bar ($54.99) does dual duty: forward-facing white light for your keyboard and papers, backward RGBIC color for the wall. A bias strip can’t light your desk at all — if you need to find a cable or read a shipping label at 11 p.m., you’re reaching for another lamp.
No adhesive, no commitment. Bars clamp on with a counterweight and lift off in one motion. That matters for monitors with curved or ultra-thin bezels where strips adhere poorly, and for anyone who swaps gear often.
Reactive effects are better executed. Because the light sits close to the screen and angles outward, sync effects (like those on the Govee Gaming Light for Monitor G1, $59.99, which covers 27–34 inch displays) read more crisply than a strip’s diffuse glow behind the panel.
Better for reducing glare, not just contrast. If your only light source is an overhead fixture, the bar can replace it, letting you kill the ceiling light entirely — a bigger comfort win than backlighting alone.
Where a Bias Lighting Strip for Monitor Wins
Price. A basic strip like Power Practical’s USB-powered TV backlight for 30″–40″ screens is $12.99 and genuinely improves dark-room comfort. The cheapest decent light bar costs two to four times that.
Invisible hardware. Some people simply don’t want anything sitting on their monitor. A strip disappears entirely — you see the wall glow, never the fixture.
Society of Motion Picture and Television Engineers-style viewing. Bias lighting’s original purpose is video: a dim (~10% of screen brightness) light behind the display makes the screen feel brighter and reduces the pupil-cramping swing between bright panel and black room. For movie nights, that’s exactly what a strip does and a bar only partially replicates.
Coverage for big screens. A 65-inch TV has a huge top edge; one bar only lights the center. Strips run the full perimeter, so wall coverage scales with screen size for pennies.
Cost Over 5 Years
Light bar: $40–$60 initial purchase. Rated LED life of 25,000–30,000 hours means even heavy nightly use (4 hours/day) gets you 17+ years before the LEDs dim meaningfully. Add maybe $5 in electricity over five years (bars draw roughly 5–10 watts). Five-year total: $45–$65, assuming you don’t upgrade.
Bias strip: $13–$35 initial. Strips draw 3–8 watts — about $3–$5 of electricity over five years. The catch is adhesive failure and the temptation to upgrade to sync-capable versions; realistically many buyers replace once. Five-year total: $15–$60 depending on whether you stop at basic.
Neither is a meaningful expense over five years. The strip is cheaper floor; the bar holds its value better if you resell when upgrading monitors.
Which One for Your Home
Small Apartment or Dorm
The strip. It’s $13–$30, invisible, USB-powered (run it off your monitor’s USB port and it switches off with the screen), and adds zero footprint to an already tight desk. Add a bar later only if you start working at night.
Family with Kids or Pets
The bar, ironically. Adhesive strips at tail height or behind a monitor that gets bumped will peel, and curious toddlers love peeling edge tape. A clamped bar is out of reach, has no exposed adhesive, and its forward white light doubles as a nursery-adjacent task light. Keep the strip’s power cable tucked if you do both.
Rental
The bar for monitors, strip for TVs — but lean bar. Strips technically remove cleanly, but warm rooms and cheap tape can leave residue on a landlord’s wall-mounted display. A bar leaves no trace: lift it off during the walkthrough and pocket it. Pair it with something freestanding like the corner floor lamp ($29.98) if you want ambient color without touching any surface permanently.
Long-Term Home
Buy once, buy synced. If you own your space, a reactive setup is worth the premium: the G1-class monitor backlight or a quality bar with a camera/mounted sensor will still feel current in 2026 and beyond, and perimeters of strips behind a wall-mounted TV are a weekend project that pays off every movie night. Spend the $50–$60 once instead of replacing a $13 strip three times.
FAQ
Do I need both a light bar and a bias lighting strip?
Not necessarily, but they’re complementary. The bar handles your desk lighting; the strip handles wall glow. Many setups run both — just avoid pointing two light sources at the same wall at full brightness, or you’ll wash out the effect.
Does bias lighting actually reduce eye strain?
The mechanism is well established: raising the brightness of the area around a screen reduces the contrast your eyes adapt to in a dark room. It won’t fix an ergonomics problem or wrong text size, but for nighttime viewing it makes a noticeable difference for most people.
Will a light bar fit my curved or ultrawide monitor?
Check the bezel. Bars need a flat top edge roughly 2–3 inches deep for the counterweight. Curved monitors with a gentle bend (1800R and shallower) usually work; aggressively curved or bezel-free designs may not sit level. Strips have no such constraint.
Can these lights run from my monitor’s USB port?
Basic strips usually can — they draw 3–8 watts, within most monitor USB output. Smart bars and sync lights with app control generally need more power and should use a wall adapter or powered USB hub, or they’ll flicker or disconnect.
