
Small desktop speakers sitting flat on your desk sound muddy and off-axis, firing at your chest instead of your ears. Desktop speaker stands lift and angle each speaker so the tweeter meets your ear line, which tightens the stereo image and cleans up the low end. For anyone who games, mixes, or just listens seriously at a desk, they are one of the cheapest audio upgrades available. Here is what to look for.
Our Top Picks
 suptek 7.9 x 6.5 Universal Desktop Speaker Stands7.9 x 6.5x 6.1"(h)7.9 x 6.5 x 6.1 inchesCheck on Amazon
 Kanto SP9 Rising Desktop Speaker Stands for Small/Medium2-4" Speakers | Upto 30lb4.4 PoundsCheck on Amazon


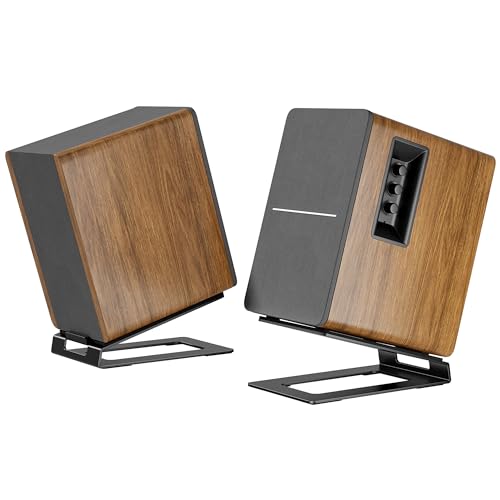
Top 3 picks at a glance
Why height and angle matter
The goal is to get the tweeter at ear height and aimed at your head, forming an equilateral triangle with your listening position. On a typical desk, small monitors need 4-8 inches of lift to reach ear level when you are seated. Stands also break the direct contact between speaker and desk, which reduces the resonance that smears bass and midrange.
As an Amazon Associate we earn from qualifying purchases at no extra cost to you.




Fixed vs adjustable
Fixed-height foam or wood wedges are cheap and effective for a set seating height. Adjustable metal stands let you dial in exact height and tilt, which is worth it if you switch between sitting and standing or share the desk.
More speaker stands worth considering
The main list covers budget clamp stands, steel risers, and a couple of Kanto designs. These six add what it lacks: true isolation stands built for studio monitors, a low-profile angled wedge, a heavy-duty riser for bigger bookshelf speakers, foam pads for the tightest budgets, and two clamp-on options that free up the desktop entirely.
IsoAcoustics ISO-155 Isolation Stands
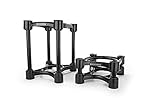
Who it’s for: home-studio owners and serious listeners with 5-6.5 inch studio monitors who care most about clean, decoupled bass and an accurate stereo image.
Key specs: each stand has a 6.1 x 7.5-inch top and adjusts between about 3 inches (short tubes) and 8.25 inches (tall tubes). Included spacers allow up to 6.5 degrees of tilt up or down, giving 14 height and tilt combinations in total. The frame is high-impact ABS with stainless-steel poles, and IsoAcoustics rates each stand for up to 40 lbs in the short setting and 35 lbs in the tall setting. A smaller ISO-130 (5.1 x 6 inches, up to 20 lbs) suits 3-4 inch monitors.
Strengths: the isolators let the speaker float rather than couple to the desk, which is exactly the resonance problem described in “Why height and angle matter” above. Tall tubes reach ear height for many seated setups without stacking risers, and the small footprint leaves room for a keyboard or controller. It is one of the most frequently recommended desktop stands in studio-gear roundups.
Drawbacks: it costs several times more than the steel and clamp stands in the main list. Tilt maxes out at 6.5 degrees, so if your speakers sit well below ear level you may still need extra height. Assembly takes a few minutes per stand, and changing height means swapping tubes rather than turning a knob.
Setup tip: set height first with the tubes, then add tilt spacers only if the tweeter still points below your ears. Make sure the stand’s top is at least as large as the speaker’s footprint is deep, so the speaker does not overhang the isolators.
How it compares: where the Kanto SP9 and steel risers in the main list focus on height, the ISO-155 adds real isolation. It is the stand to choose if you mix or produce music at your desk and want what you hear to translate to other systems.
Kanto S4 Tilted Desktop Speaker Stands

Who it’s for: anyone with mid-size 3-4 inch desktop speakers or monitors who sits close to the speakers and mainly needs to aim them upward, not raise them much.
Key specs: a fixed 16-degree upward tilt, a 3.9 x 6.1-inch speaker resting surface, an overall height of about 2 inches, and a load limit of 8 lbs per stand. The steel body has a powder-coated finish, foam isolation pads top and bottom, and a raised rear tab that stops the speaker sliding back. There is a 1/4″-20 mounting point underneath, and Kanto lists a 5-year warranty.
Strengths: it solves the most common desktop problem, speakers firing at your chest, with almost no added height or footprint. The steel build feels more substantial than foam wedges, and the rear lip keeps speakers in place even when you bump the desk. A smaller S2 version serves compact 2-3 inch speakers.
Drawbacks: the tilt is fixed, so it cannot be dialed in for different seating heights. The 8 lb limit and small top rule out most 5-inch studio monitors. With only about 2 inches of lift, very low desks or tall users may need a taller stand instead.
Setup tip: sit in your normal position and check that the tweeter axis points at your ears; if it aims over your head, the speakers are already close to ear height and a flat riser is the better choice.
How it compares: it is the sturdier, steel alternative to the Monoprice tilted wedge in the main list, with a longer warranty but a smaller weight limit. Choose the Kanto SP9 instead if you need height rather than angle.
Kanto SP6HD Desktop Speaker Stands

Who it’s for: owners of larger powered bookshelf speakers or 4-7 inch studio monitors that are too big or heavy for compact desktop stands.
Key specs: a fixed 6-inch height, two included top-plate sizes (4.3 x 7.1 inches and 7 x 7 inches), a 7 x 8.5-inch base, and a rating of 30 lbs per stand. The top plates swivel about 15 degrees left or right for toe-in but do not tilt. Heavy steel construction with closed-cell foam padding, a hollow column for cable routing, and a 1/4″-20 mounting screw on each plate round it out.
Strengths: the wide, heavy base addresses the tipping concern raised in “Cable and stability notes” below. Six inches of lift brings most medium speakers close to ear level at a typical desk. Built-in swivel makes toe-in easy without moving the base, and the hidden cable channel keeps the setup neat.
Drawbacks: there is no tilt adjustment, so pair it with angled pads if your ears are still above the tweeter. It takes up more desk area than slim isolation stands, and it sits in the upper-mid price tier for a fixed-height design.
Setup tip: use the larger plate for speakers with a deep cabinet so the front edge does not overhang, and route speaker cable through the column before placing the speaker.
How it compares: it is the heavier-duty sibling of the Kanto SP9 and SE2 in the main list, built for bigger speakers. Against the MODEGAO 44 lb steel stands, it offers swivel plates and a cleaner cable path.
Auralex MoPAD Monitor Isolation Pads

Who it’s for: budget buyers, renters, and anyone who wants to try isolation and tilt before spending on stands, as the FAQ above suggests.
Key specs: each pad measures about 12 x 4 x 2 inches, and the standard pack includes four pads, two per monitor. Each pad splits into two pieces with a 4-degree angle, and wedge adjusters let you set the speaker at -8, -4, 0, +4, or +8 degrees. A wider MoPAD-XL exists for bigger speakers. Some listings sell a single pair, so check the pad count.
Strengths: high-density foam decouples the speaker from the desk at low cost, and the five tilt settings cover most below-ear-level setups. Two pads per speaker adapt to almost any cabinet size, from small multimedia speakers to 8-inch monitors.
Drawbacks: roughly 2 inches of height will not lift small speakers to ear level on its own. Foam can compress and sag over years, and soft supports let the speaker rock slightly when you adjust volume knobs on the front. It looks utilitarian next to steel or wood stands.
Setup tip: place the pads under the outer edges of the speaker rather than the center for maximum stability, and recheck the angle after a week as the foam settles.
How it compares: it fills the “foam isolation wedge” row of the stand types table at the best-value end. Pair it with a riser, or step up to the ISO-155 if you want both height and isolation in one product.
Liquid Stands MS112 Clamp-On Monitor Stands

Who it’s for: producers and gamers with crowded desks who want monitors lifted off the surface entirely, with heavy-duty support and generous tilt.
Key specs: a 9 x 12.5-inch platform, height adjustable from about 9.5 to 13.5 inches, tilt from 0 to 20 degrees, and clamps that fit desks 0.5-2 inches thick. Stainless-steel construction with a 4-inch-wide base is rated for up to 65 lbs, the plates can be set horizontally or vertically with removable lips, and 6 mm anti-slip padding sits under the speaker. Liquid Stands lists a 10-year warranty.
Strengths: clamp mounting frees the desk area that stands would occupy, leaving room for a keyboard, controller, or MIDI gear. The 20-degree tilt range is wider than any stand in the main list, which helps when the speakers sit high and need to aim down. The large platform takes big monitors or horizontally oriented center speakers.
Drawbacks: it sits in the upper-mid price tier and needs a clear desk edge for both clamps. Clamped stands connect the speaker to the desk structure, so add isolation pads if you hear desk resonance. Assembly is required.
Setup tip: clamp toward the back corners, set the height so the tweeter matches ear level, and then angle each plate toward your head before locking the tilt.
How it compares: it is a heavier, more adjustable alternative to the two Vondynote clamp stands in the main list, with higher weight capacity and a much longer warranty.
VIVO Clamp-On Speaker Stands (MOUNT-SP01CB)
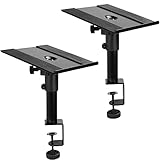
Who it’s for: gamers and desk-setup builders who want clamp stands that handle thick desktops and offer both tilt and swivel at a moderate price.
Key specs: 9.5 x 8.8-inch trays with EVA foam padding, four locking heights (about 9.5, 10.7, 12.5, and 14.3 inches), tilt of plus or minus 10 degrees, and 360-degree plate rotation. The steel clamps fit desktops up to 2.5 inches thick, and each stand is rated for 33 lbs.
Strengths: the wide clamp range covers thick butcher-block and gaming desks that defeat many clamp stands. Full rotation makes toe-in simple, and locking height positions keep both speakers at matching heights without measuring.
Drawbacks: the plates sit centered over the clamp, so you may need to pull the desk a few inches from the wall to fit them. Height adjusts in fixed steps rather than continuously. As with any clamp stand, add pads if the desk transmits vibration.
Setup tip: choose the same locking position on both sides, then fine-tune aim with the tilt and rotation rather than by moving the clamps.
How it compares: it sits between the Vondynote clamps and the Liquid Stands MS112 on price and capability. Pick it over the Liquid Stands if your desk is thicker than 2 inches.
Quick comparison of the additional stands
Price tiers are approximate per pair and change with sales; use them to compare classes of product rather than as exact figures.
| Stand | Type | Height | Tilt | Capacity (each) | Price tier |
|---|---|---|---|---|---|
| IsoAcoustics ISO-155 | Isolation stand | About 3 or 8.25 in | Up to 6.5° up or down | 35-40 lbs | Premium |
| Kanto S4 | Steel angled wedge | About 2 in | Fixed 16° up | 8 lbs | Budget |
| Kanto SP6HD | Steel riser | 6 in | None (swivel only) | 30 lbs | Mid-range |
| Auralex MoPAD | Foam isolation pads | About 2 in | -8° to +8° | High (dense foam) | Budget |
| Liquid Stands MS112 | Clamp-on | 9.5-13.5 in | 0-20° | 65 lbs | Mid-range |
| VIVO MOUNT-SP01CB | Clamp-on | 9.5-14.3 in (4 steps) | ±10° | 33 lbs | Mid-range |
Stand types compared
| Type | Height range | Isolation | Price |
|---|---|---|---|
| Foam isolation wedge | Fixed 2-4 in | Excellent decoupling | Budget |
| Wood/MDF riser | Fixed 4-6 in | Good, add pads | Budget to mid-range |
| Adjustable metal stand | 4-8 in, tiltable | Good with feet | Mid-range |
| Clamp/arm mount | Wide, off-desk | Very good, frees desk | Mid-range to premium |
How to work out the height you need
Guessing stand height is the most common mistake. A two-minute measurement gives you the exact number to shop for.
- Sit in your normal listening position. Use your usual chair height and posture, not an upright “measuring” pose.
- Measure ear height above the desk. Hold a tape measure on the desktop and note where it meets the level of your ears. For many seated users this is roughly 16-20 inches above the desk surface.
- Find the tweeter height on your speaker. Measure from the bottom of the speaker to the center of the tweeter (the small driver, usually at the top).
- Subtract. Ear height minus tweeter height equals the lift you need. If a 5-inch monitor’s tweeter sits 8 inches above its base and your ears are 17 inches above the desk, you need about 9 inches of lift, which points to a tall isolation stand or a clamp stand.
- Use tilt for the remainder. If a stand gets you within 2-3 inches, angling the speaker upward a few degrees closes the gap. Larger gaps are better solved with height, since heavy tilt can make the speaker’s sound brighter or less even.
Also check where the woofer and tweeter are arranged. Some monitors are designed with the tweeter at the top and should not be placed on their side; others allow horizontal placement. Follow the manufacturer’s orientation guidance, especially with two-way monitors, because the way the drivers blend depends on it.
Isolation explained: foam, spikes, and decoupling stands
“Isolation” covers several different approaches, and they behave differently on a desk.
- Foam pads and wedges absorb vibration before it reaches the desk. They are cheap and effective, but soft, so the speaker can rock slightly.
- Rubber or sorbothane feet under a rigid stand reduce transmission with a firmer feel. They are a simple add-on for metal risers.
- Decoupling stands such as IsoAcoustics designs use engineered isolators that let the speaker move slightly in a controlled way, so cabinet energy is not passed into the desk.
- Spikes and cones come from floor-standing hi-fi and work best on solid floors. On a hollow desk they offer little benefit and can scratch the surface.
Desks are often thin panels that resonate easily, which is why some form of decoupling usually makes a noticeable difference to bass clarity. If your desk is solid hardwood, the benefit is smaller, but height and angle still matter just as much.
Match the stand to your speakers
Weight and footprint
Confirm the stand’s top plate is large enough for your speaker base and rated for its weight; a 6-8 lb studio monitor needs a sturdier stand than a 2 lb multimedia speaker. Ratings vary widely, from about 8 lbs per speaker on compact angled stands to 20-45 lbs on heavy steel risers like the 44 lb-rated pair in our list, so most 3-5 inch monitors are covered with room to spare.
Isolation feet and tilt
Foam wedges tilt the speaker up 5-15 degrees, ideal when the speaker sits below ear level. If your stands are rigid metal, add dense foam or rubber isolation pads underneath to stop desk resonance, or you lose part of the clarity benefit the height gave you.
Stand materials compared
Material affects stability, isolation, looks, and how much you will pay. Each common option has a clear role.
- Steel: strong, slim, and stable when the base is wide and heavy. Steel transmits vibration easily, so good steel stands add foam or rubber pads between speaker and plate and under the base.
- Wood and MDF: dense and naturally damped, with a warmer look that suits home offices. Solid risers can be bulky, and cheaper MDF chips at the corners if bumped.
- High-density foam: the best isolation per dollar, light, and easy to cut or stack. It offers little height and can compress over time.
- ABS and engineered isolators: used in decoupling stands, combining rigid frames with tuned isolating elements. More expensive, but they deliver height and isolation in a compact footprint.
- Acrylic and aluminum: mostly about style. They look clean on minimalist desks, but check that they include isolation feet.
Step-by-step: setting up your stands
- Clear and measure. Measure ear height and tweeter height as described above, and decide on the separation between speakers, usually 2-4 feet on a desk.
- Place the stands symmetrically. Center them on your seating position, with each stand the same distance from the monitor’s midline and from the back wall.
- Mount the speakers. Use the 1/4″-20 screw if your speaker has a threaded insert; otherwise, rely on the pads and rear lips. Make sure the speaker sits fully on the plate.
- Set the toe-in. Angle each speaker so it points at your head. A quick check: sit down and you should just see the inner side panel of each speaker, or none at all.
- Adjust tilt last. Only add tilt if the tweeters remain below ear level.
- Route and tidy cables. Run cables down the back of the stands or through hollow columns, leaving a little slack so they do not tug on the speakers.
- Listen and fine-tune. Play familiar music with clear vocals. The voice should sit firmly in the center between the speakers. If it leans to one side, check distances and angles.
Stand guide by speaker size
Speaker size is the quickest way to narrow the field. The figures below are typical ranges; always check your own speaker’s weight and base dimensions.
| Speaker class | Typical weight (each) | Typical base | Good stand types |
|---|---|---|---|
| Compact multimedia (2-3 in drivers) | 1-3 lbs | About 3-4 x 4-5 in | Angled wedges, small foam pads, compact risers |
| Mid-size desktop or 3-4 in monitors | 3-8 lbs | About 4-5 x 6-7 in | Angled steel stands, small isolation stands, adjustable risers |
| 5 in studio monitors | 8-12 lbs | About 6-7 x 8-9 in | Medium isolation stands, steel risers, clamp stands |
| 6.5-8 in monitors and large bookshelf | 12-25 lbs | About 8-10 x 10-12 in | Heavy-duty risers, large clamp stands, or floor stands behind the desk |
Large 8-inch monitors often outgrow a desk altogether. If yours dominate the desktop, floor stands placed just behind the desk deliver the right height and remove desk resonance completely, at the cost of floor space.
Special desk situations
Standing desks
Speakers on a sit-stand desk move with the surface, so the tweeter-to-ear relationship changes when you stand. Adjustable-height stands or clamp stands with quick height changes are useful here. Some people simply accept a compromise height between sitting and standing positions, or add a slight upward tilt that works acceptably in both.
L-shaped and corner desks
Corner placement tends to add bass, and asymmetric desks make equal spacing harder. Sit at the main working position and place each speaker the same distance from your head, even if that means one stand sits closer to a wall. Use the speaker’s boundary EQ setting, if it has one, to tame extra bass.
Shallow desks
On desks less than about 24 inches deep, there may be no room for stands beside the monitor. Clamp stands on the back corners, or a monitor arm that frees the space under the screen, solve the problem without crowding the keyboard.
FAQ
Do speaker stands really improve sound, or is it hype?
The improvement is real and easy to hear: raising the tweeter to ear level fixes the tonal balance, and decoupling from the desk tightens bass by killing resonance. It will not turn a cheap speaker into a great one, but it lets any speaker perform to its potential.
Can I DIY speaker stands instead of buying them?
Yes, a stack of dense books or a wood block with a foam pad works in a pinch and captures most of the height and isolation benefit. Purpose-made stands mainly add stability, correct tilt, and a cleaner look, so DIY is a fine way to test the concept before spending.
What height should desktop speaker stands be?
Tall enough to put the tweeters at your seated ear height. Most people need 4-9 inches of lift depending on the speaker size, chair, and desk height. Measure ear height above the desk, subtract the speaker’s tweeter height, and buy a stand that covers the difference.
Should speakers be tilted up or kept level?
If the tweeters reach ear height, keep them level and aim them at your head horizontally. Tilt is a fix for speakers that sit below ear level: angle them up just enough that the tweeter axis points at your ears. Too much tilt can shift the tonal balance, so use the minimum that works.
Are clamp-on speaker stands better than desktop stands?
Not better for sound, but better for space. Clamp stands lift speakers off the desk surface and leave room for keyboards, controllers, or a second monitor. They also offer wide height ranges. Because they connect to the desk frame, add isolation pads if you notice bass resonance.
Do speaker stands help gaming audio?
Yes. Positional audio in games depends on the same stereo image that music does. Getting the tweeters to ear height and toeing the speakers in sharpens left-right placement, which helps you locate footsteps and effects. Headphones are still more precise for competitive play, but stands make desktop speakers far more useful.
How much weight can desktop speaker stands hold?
It varies widely: compact angled stands may be rated for about 8 lbs per speaker, while heavy steel risers and clamp stands commonly handle 30-65 lbs. Check the per-stand rating against your speaker’s weight, and leave a margin for safety, especially with clamp stands that hang the speaker off the desk edge.
Positioning for the best stereo image
Height is only half the job; angle and spacing finish it. Toe the speakers inward so each one points at your head, forming an equilateral triangle where the distance between the two speakers equals the distance from each speaker to your ears. On a desk that usually means 2-4 feet of separation with a matching listening distance, which pulls the stereo image into sharp focus.
Keep the speakers off the wall where possible. A rear-ported monitor pushed hard against a wall gets a bloated, boomy bass because the port reflection reinforces low frequencies. Stands that let you pull the speakers a few inches forward, combined with the port clearance a riser provides, tighten the low end as much as the height fix cleans up the mids and highs.
Cable and stability notes
Taller stands can get tippy if the base is small, so favor a wide, weighted base for anything above 6 inches, especially with a heavier studio monitor on top. Route the speaker cable down the back of the stand with a clip so it does not pull the speaker off-axis or drag the light foam wedge out of position.
Common mistakes to avoid
- Buying by looks instead of height. A beautiful stand at the wrong height fixes nothing. Measure first.
- Undersized top plates. A speaker overhanging its stand is unstable and loses some isolation benefit. The plate should support the whole base, or nearly all of it.
- Ignoring the rear port. Pushing rear-ported speakers against a wall on tall stands can make bass boomy. Leave a few inches of clearance and experiment.
- Mismatched heights. Left and right speakers should sit at the same height and distance from you. Uneven stands pull the stereo image to one side.
- Placing speakers beside the monitor’s bezel edge. Speakers set right against a large monitor can suffer reflections from the screen. Move them slightly forward or outward if the sound seems smeared.
- Overtightening clamps. Clamp stands only need to be firm. Crushing a thin desktop or laminate can damage it.
Which speaker stand should you buy?
- Studio monitors and mixing: IsoAcoustics ISO-155 (or ISO-130 for small monitors) for height and true isolation.
- Small speakers that only need aiming: Kanto S4 or a tilted wedge from the main list.
- Larger bookshelf speakers: Kanto SP6HD or a heavy steel riser with a wide base.
- Tight budget or trial run: Auralex MoPAD foam pads.
- Crowded desk: Liquid Stands MS112 for maximum tilt and capacity, or VIVO MOUNT-SP01CB for desks thicker than 2 inches.
Beyond stands: getting more from a desktop speaker setup
Stands are the biggest single improvement for desktop speakers, but a few related tweaks build on them.
Watch the desk reflection
A large, flat desk acts like a mirror for sound, bouncing a delayed copy of the speaker output into your ears. Raising speakers and pulling them toward the front edge reduces that reflection. A desk mat or keeping clutter off the area between you and the speakers helps a little too.
Handle the bass properly
Small speakers placed near a wall or in a corner get extra bass from boundary reinforcement, which can sound boomy. Many studio monitors include rear-panel boundary or low-frequency switches to compensate. If your speakers have one, try the setting that matches your placement before buying room treatment.
Consider a subwoofer for gaming and movies
Compact desktop speakers rarely reproduce deep bass. For explosions and soundtracks, a small subwoofer under the desk fills in the low end and lets the main speakers work less hard. Place it on a dense pad or isolation platform so it does not rattle the floor or desk.
Use room correction or EQ sparingly
Some powered speakers and audio interfaces offer room correction or simple EQ. After positioning, a small cut to an obvious bass bump can help. Fix placement first; EQ cannot undo speakers pointed at your chest.
Speaker stands for gaming desks
Gaming desks bring large monitors, wide mouse pads, and sometimes RGB strips along the back edge. Clamp stands keep speakers off the work surface and let you position them either side of an ultrawide monitor at the right height. If the monitor itself sits on an arm, aim to keep the speakers slightly in front of the screen plane so the screen does not reflect sound back into the speakers’ path.
Useful extras for a speaker stand setup
- Isolation feet or pads: small rubber, sorbothane, or foam pads under a rigid stand add decoupling for little cost and protect the desk finish.
- Blu-tack or museum putty: a few small pieces between speaker and plate stop light speakers from sliding and reduce rattles, and they remove cleanly.
- Cable clips and sleeves: keep speaker cables and power leads running neatly down the stand, so they do not pull the speakers off-axis.
- Angle guide or phone level app: helps set both speakers to the same tilt and toe-in angle, which keeps the stereo image centered.
- Measuring tape: the cheapest audio tool you will own. Use it to match left and right distances from your head to within an inch.
- Subwoofer isolation platform: if you add a sub under the desk, a dense pad stops it from shaking the floor and furniture.
None of these replace a proper stand, but each closes a small gap between a setup that measures well on paper and one that sounds focused and balanced from your chair.
Bottom line
Buy a pair of stands that raise your speaker tweeters to seated ear level, tilt them at your head, and decouple them from the desk. Our top pick, the Vondynote clamp stands, frees up desk space while lifting and angling small monitors; foam wedges are the best-value option for a fixed seating height, and adjustable metal stands justify their price if you need exact height or tilt. Either way, it is the rare cheap upgrade you will hear the moment you sit down.


