
The best camera cages for video production are the ones that fit your exact camera, provide the mounting points your rig needs, and preserve access to the battery, ports, and controls without adding unnecessary weight.
As an Amazon Associate we earn from qualifying purchases at no extra cost to you.


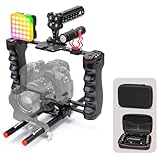
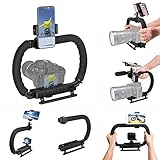
Top 3 picks at a glance
Best Camera Cages for Video Production: Quick Recommendations
| Production need | Best cage type | Material to prioritize | Typical weight | Typical market range |
|---|---|---|---|---|
| Lightweight mirrorless setup | Minimal half cage or compact full cage | Machined aluminum | 150–300 g | Usually $80–$180 |
| Run-and-gun documentary work | Full cage with NATO rail and multiple 1/4″-20 mounts | Aluminum with steel hardware | 250–500 g | Usually $120–$250 |
| Cinema camera or heavy lens | Full cage with top handle and support points | Aluminum or aluminum with reinforced interfaces | 500–1,000 g | Usually $250–$600 |
| Gimbal or travel rig | Compact cage with removable side plates | Lightweight aluminum | 150–350 g | Usually $100–$250 |
| Studio or commercial build | Modular cage with ARRI-style locating points | Rigid machined aluminum | 400–900 g | Usually $250–$700 |
What a Camera Cage Actually Does
A cage surrounds or partially surrounds the camera with a rigid mounting frame. It gives you secure attachment points for a monitor, microphone, wireless receiver, follow-focus motor, handle, SSD, battery plate, or shoulder-rig accessories. It also protects the camera body from minor knocks, although it is not a replacement for a hard case or impact protection.
The cage should be treated as the foundation of the rig rather than an accessory that automatically improves image quality. A poorly matched cage can block a battery door, make a memory-card change awkward, interfere with a flip-out screen, or add more weight than the camera can comfortably support.
Materials: Aluminum, Steel, and Carbon Fiber
Machined aluminum
Aluminum is the standard choice for most video cages because it combines low weight, stiffness, and reasonable cost. A properly machined aluminum cage is strong enough for monitors, microphones, handles, and compact lens-support systems. Anodized finishes also resist scratches and reduce wear around mounting threads.
Look for a cage with a broad base and a solid camera-mounting plate. Thin decorative side rails are less important than a connection that prevents the camera from twisting inside the cage.
Steel components
Steel is commonly used for screws, locating pins, threaded inserts, and high-load sections. It handles repeated tightening well but adds weight. Steel is useful where an accessory is frequently removed, such as a NATO rail or rosette arm. It is not usually desirable as the main cage material for a handheld rig.
Carbon fiber
Carbon fiber can reduce weight, but it is less common in affordable universal cages. It is valuable when every gram matters, yet the mounting hardware still determines much of the system’s strength. A carbon-fiber panel with weak threaded inserts is not automatically better than a well-designed aluminum cage.
Mounting Points That Matter
- 1/4″-20 threads: The universal standard for handles, monitors, lights, and small accessories.
- 3/8″-16 threads: Better for heavier accessories and tripod or support interfaces.
- ARRI-style locating holes: Prevent compatible accessories from rotating under load.
- NATO rail: Allows a handle or monitor arm to slide on and off quickly while retaining a compact profile.
- ARRI rosettes: Provide strong, adjustable attachment for side handles and shoulder-rig arms.
- Cold shoes: Convenient for microphones and receivers, but do not use them as the sole support for a heavy monitor.
- Strap slots: Useful for retaining the camera strap or attaching a safety tether.
- QD sockets: Helpful for shoulder straps and quick-release systems, provided they are firmly anchored.
More holes are not automatically better. A cage with carefully positioned mounting points is easier to balance than one covered with unused threads. Check whether the handle sits over the camera’s center of gravity and whether a monitor arm can be tightened without colliding with the lens or microphone.
Camera Compatibility: Full Cage or Universal Cage?
A model-specific cage is usually the safest choice for production. It is shaped around the camera’s grip, battery door, ports, screen hinge, card slot, and strap lugs. SmallRig, Tilta, 8Sinn, Kondor Blue, and Wooden Camera all make camera-specific systems for many Sony, Canon, Panasonic, Nikon, Blackmagic Design, and cinema-camera bodies.
A universal cage is more flexible, but the camera is normally held by an adjustable base or clamp. That can be useful for changing bodies, but it may leave controls partially covered or allow the camera to shift when a heavy accessory is mounted. For a fixed production camera, the improved fit of a dedicated cage is usually worth the extra cost.
Check compatibility in this order
- Camera body: Confirm the exact model, not merely the product family. Small changes between generations can move a port or alter the grip shape.
- Lens clearance: Check that the cage does not contact the lens release button, lens mount, or oversized adapter.
- Battery and card doors: Open both with the cage installed and a quick-release plate attached.
- Screen movement: Swing the display through its full range, including the position needed for self-monitoring.
- Ports and cables: Insert the actual HDMI, USB, microphone, and headphone cables you plan to use.
- Tripod interface: Confirm that the cage works with your plate standard, such as Manfrotto-style, Arca-type, or a 15 mm LWS base.
Rig Weight: Calculate Before You Buy
A cage can look light by itself while becoming tiring once accessories are attached. Add the camera, lens, cage, top handle, monitor, battery, microphone, and cables before deciding whether the rig is appropriate for handheld work.
For example, consider a compact mirrorless setup:
- Camera body: 650 g
- Standard zoom lens: 700 g
- Cage: 300 g
- Top handle: 180 g
- 5-inch monitor: 250 g
- Monitor battery: 120 g
- Microphone and mount: 130 g
- Cables and small accessories: 100 g
The total is 2,430 g, or about 2.4 kg. That is manageable for short handheld shots but demanding for a full day of documentary shooting. Replacing the cage with a 180 g half cage saves only 120 g, while removing the external monitor saves about 370 g. The calculation shows where weight reductions have the greatest effect.
For a gimbal, concentrate weight close to the camera’s centerline. A side handle, large monitor arm, or external battery may make balancing impossible even when the total payload is below the gimbal’s rated capacity.
Battery, Port, and Control Access
Access is more important than the number of mounting holes. A cage that blocks a battery door forces you to remove the camera from the rig during a battery change. A cage that presses against an HDMI connector can damage the port or cause intermittent signal loss.
Prioritize removable side plates when the camera uses a flip-out screen. The plate should leave enough clearance for the screen to open without striking a handle or monitor arm. For cameras that record to an external SSD, verify that the USB-C cable can exit without a sharp bend. A short, right-angle cable often reduces strain, but it must not obstruct the camera’s card door.
Controls should remain usable while the cage is fitted. You should be able to reach the record button, joystick, dials, mode switch, and diopter. A top handle positioned too far forward can also block the camera’s built-in controls or make the rig front-heavy.
Decision Matrix: Match the Cage to Your Production
| Your situation | Recommended configuration | Why | What to avoid |
|---|---|---|---|
| Solo operator, handheld interviews | Full cage, NATO top handle, compact monitor | Fast control and enough mounting space without a large shoulder rig | Oversized rods and a heavy V-mount plate |
| Gimbal shooting | Minimal cage or half cage with low-profile plate | Reduces balancing time and keeps the center of gravity close | Large side handles and extended monitor arms |
| External recording | Full cage with cable clamp and SSD mount | Protects the USB or HDMI connection from accidental pulls | Unsecured cables hanging from the camera |
| Shoulder-mounted cinema rig | Full cage, 15 mm base, rosette handles, support plate | Provides repeatable balance and stronger accessory support | Relying on a single 1/4″-20 screw for the entire rig |
| Multi-camera production | Identical model-specific cages on every body | Creates consistent handle, plate, and cable positions | Mixing cage standards that require different accessories |
Strong Cage Options by Design
SmallRig
SmallRig offers a broad range of camera-specific cages and modular accessories. Its systems are a practical choice when you need many 1/4″-20 and 3/8″-16 mounting points, NATO rails, cable clamps, or interchangeable handles. They are particularly suitable for mirrorless cameras and compact cinema bodies where the rig may evolve over time.
Tilta
Tilta’s camera cages and Tiltaing systems are useful when you want a more integrated build with compatible handles, power solutions, baseplates, and lens-support accessories. They are a good fit for operators who prefer a complete ecosystem rather than assembling every part from different manufacturers.
8Sinn
8Sinn cages emphasize a clean, low-profile design and integrated mounting options. They suit operators who want a rigid cage without excessive protrusions, especially for mirrorless cameras, compact cinema cameras, and gimbal-friendly configurations.
Kondor Blue and Wooden Camera
Kondor Blue is known for robust cage and rig components aimed at professional workflows, including color-matched systems and strong cable-management options. Wooden Camera targets more production-oriented builds, with cage systems designed to integrate with cinema accessories, support rods, and studio configurations.
Frequently asked questions
Can a camera cage improve image quality?
No, a camera cage does not automatically improve image quality. It functions as the foundation of a rig by providing attachment points for accessories such as a monitor, microphone, wireless receiver, follow-focus motor, handle, SSD, or battery plate. It can protect the camera body from minor knocks, but it is not a replacement for a hard case or impact protection.
Should I choose a half cage or a full cage?
Choose a half cage when minimizing weight or preserving a compact setup is the priority, and choose a full cage when you need more mounting points and accessory support. A half cage may be useful for lightweight mirrorless or gimbal rigs, while a full cage is better suited to monitors, handles, cable clamps, and more elaborate production configurations.
How can I stop accessories from rotating on the cage?
Use ARRI-style locating holes or ARRI rosettes when an accessory must resist rotation under load. Locating holes help prevent compatible accessories from twisting, while rosettes provide strong, adjustable attachment for side handles and shoulder-rig arms. A 1/4″-20 thread is suitable for many small accessories, but it may not provide the same anti-rotation support.
What should I attach to a cold shoe?
Use a cold shoe for relatively light accessories such as a microphone or wireless receiver. Do not use it as the sole support for a heavy monitor. For heavier or more adjustable attachments, consider the cage’s 1/4″-20 or 3/8″-16 threads, NATO rail, ARRI-style locating holes, or ARRI rosettes, depending on the accessory and required support.
How do I reduce rig weight most effectively?
Remove the heaviest unnecessary accessory rather than focusing only on the cage. In the example setup, replacing a 300 g cage with a 180 g half cage saves 120 g, while removing the 250 g monitor and 120 g monitor battery saves about 370 g. For gimbal work, also keep weight close to the camera’s centerline to simplify balancing.
Final Buying Checklist
- Choose a dedicated cage when the camera will stay in the rig.
- Choose a lightweight or half cage when gimbal balance and travel weight are priorities.
- Require at least one secure point for a top handle and one for a monitor or recorder.
- Prefer ARRI-style locating points for accessories that must not rotate.
- Test battery, card, screen, and port access before adding accessories.
- Calculate the complete rig weight rather than comparing cage weights alone.
- Add a cable clamp when using HDMI, USB-C recording, or an external monitor.
- Use a cage with a solid base and multiple attachment points for shoulder or studio rigs.
The best camera cages for video production are not necessarily the largest or most heavily accessorized. The right choice is the cage that protects the camera, supports the accessories you actually use, keeps the rig balanced, and lets you change batteries, connect cables, and operate every control without dismantling the setup.


