
A cable tray that crashes down in the middle of the night or dumps a tangle of power strips onto your feet is more than an annoyance. When adhesive fails, heavy adapters, surge protectors, and bundled cables — often 4 to 8 pounds total — can yank on connections, bend plugs, scuff floors, and leave a sticky residue that is harder to clean the second time around. Worse, a poorly reattached tray usually falls again within days, taking paint or desk laminate with it and forcing you to drill or buy a whole new system. Fixing it correctly takes less than 30 minutes and keeps your under-desk setup secure for years without damaging the desk.
What You Need
| Item | Why You Need It | Optional? |
|---|---|---|
| Isopropyl alcohol 70% or higher and lint-free cloths | Removes dust, oils, and old adhesive residue so new adhesive bonds to the desk, not to grime | No |
| Plastic scraper or old credit card | Lifts failed adhesive strips and leftover foam without gouging wood, melamine, or metal | No |
| Painter’s tape and pencil | Marks exact placement and holds tray in position while adhesive cures | No |
| Hair dryer or heat gun on low | Softens stubborn adhesive for clean removal and warms surfaces for better initial tack | Yes |
| Replacement adhesive: heavy-duty double-sided acrylic tape (rated for 10-15 lbs) or 3M VHB strips | Creates a lasting bond; standard foam tape often fails above 90 degrees Fahrenheit or on textured surfaces | No |
| Cable tray (if replacing) | A new tray is needed if the old one is warped or cracked; typical under-desk trays are 13 to 25 inches long, 3 to 5 inches wide, and hold 5 to 10 lbs. For example, options in the $15 to $25 range include a 2 Pack No-Screw Cable Management Under Desk, Self-Adhesive Cord Organizer in black around $18.99 and a 25-inch metal Mzmaxy Cable Management Tray around $21.59 | Yes, if tray is damaged |
| Small level or smartphone level app | Ensures the tray is straight so cables do not slide to one side and stress the adhesive | Yes |
| Cable ties or Velcro straps | Bundles cables and reduces pull-force on the tray; most desk setups use 6 to 10 straps | Yes |
Step-by-Step
Step 1: Unload and Inspect the Tray (5 minutes)
Unplug everything for safety, then lift the fallen tray and empty it completely. Most failures happen because the tray is overloaded. Check the rating on your tray — lightweight plastic organizers typically support 5 to 7 pounds, while steel mesh trays handle 10 to 15 pounds. A single large surge protector plus two laptop chargers at 65 to 100 watts each can already weigh 4 to 6 pounds before you add cables. Inspect the tray for warping, cracked screw holes, or bent adhesive plates. If the mounting surface on the tray is bowed more than 1/8 inch, replace it rather than re-gluing. Otherwise, set it aside for cleaning.
As an Amazon Associate we earn from qualifying purchases at no extra cost to you. Product prices and availability are accurate as of the date shown and are subject to change.
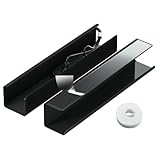

Step 2: Remove Old Adhesive Completely (7 minutes)
What is left on the desk matters more than what you add. Heat the old adhesive residue for 30 to 45 seconds with a hair dryer on medium heat held 4 to 6 inches away. Then slide the plastic scraper under the foam at a low angle and peel slowly. Avoid metal putty knives, which scratch laminate and veneer. Once the bulk is off, wipe the desk underside and the tray’s mounting plate with isopropyl alcohol on a lint-free cloth. Scrub in circles until the cloth comes away clean and the surface feels smooth, not tacky. For textured or wood-grain laminate, repeat twice. Let both surfaces dry for 3 to 5 minutes. Any oil from fingerprints will weaken the new bond, so avoid touching the cleaned areas.
Step 3: Prep the Location and Test Fit (5 minutes)
Hold the empty tray against the underside of the desk in your desired position. Standard placement is 2 to 4 inches from the back edge and at least 1 inch away from desk legs or crossbars to allow airflow and legroom. Use a pencil to lightly outline the tray’s footprint and place painter’s tape just outside the outline as a guide. Check with a level. If the desk underside is rough, particleboard, or has a thick texture, sand the contact area lightly with 220-grit sandpaper and wipe again — smooth, non-porous surfaces bond 3 to 4 times better. As of 2026, many standing desks use powder-coated steel frames; these need the alcohol wipe step twice because of the slight oily film from manufacturing.
Step 4: Apply New Heavy-Duty Adhesive (4 minutes)
Cut strips of heavy-duty double-sided acrylic mounting tape to match the length of the tray’s mounting rails. For a 13 to 15 inch tray, use two full-length strips; for a 25 inch tray, use three strips spaced evenly. Do not use thin office tape or small 1-inch squares from the dollar store — you need continuous contact. Peel one side and press the tape firmly onto the tray first, not the desk. Apply with steady pressure for 20 to 30 seconds per strip using the heel of your hand. If the tape has a red liner marked VHB or acrylic foam, that is the correct grade. Allow the tape to set on the tray for 2 minutes before mounting.
Step 5: Mount the Tray and Apply Pressure (3 minutes)
Warm both the desk underside and the tray tape with a hair dryer for 20 seconds — adhesive activates best between 70 and 85 degrees Fahrenheit. Peel the second liner, align the tray inside your pencil marks, and press straight up. Once in contact, do not slide it. Press hard for 60 to 90 seconds, pushing across the entire mounting plate, not just the center. Apply about 10 to 15 pounds of upward pressure — you should feel your arms working. For extra hold, place a stack of books or a small jack on the floor pushing up against the tray if clearance allows, or use painter’s tape as a sling from one side of the desk to the other for support.
Step 6: Cure Before Loading (20 to 60 minutes, passive)
This is where most re-installs fail. Even instant-tack tapes need cure time to reach full shear strength. Leave the tray empty and supported for at least 30 minutes, ideally 60 minutes, before adding any weight. Keep the room above 65 degrees Fahrenheit during curing. Do not hang cables over the edge to test it. After the wait, remove support tape and gently tug down with 5 pounds of force to confirm it is solid. If it shifts at all, remove and repeat Step 4 with fresh tape — reused tape loses more than 50 percent of its strength.
Step 7: Reload Cables Strategically (6 minutes)
Bundle cables with Velcro straps every 8 to 12 inches before placing them in the tray. Keep heavy items centered, not at the ends. Place the surge protector or power brick flat in the tray, not hanging over the lip, and route cables so they enter and exit without pulling downward. Leave 2 to 3 inches of slack near plugs to prevent tension when you raise a standing desk. Total load should stay at least 20 percent below the tray’s rated weight — for a tray rated at 10 pounds, aim for 8 pounds max. Use adhesive cable clips on the desk legs to guide vertical drops and reduce swinging weight.
Mistakes to Avoid
Re-sticking over dust and old foam is the most common error. New tape stuck to old residue will hold for a day, then fail again and leave an even thicker mess. Always strip to the bare desk surface.
Overloading with daisy-chained power strips creates both a weight and a fire risk. Most under-desk trays are not designed to hold two full surge protectors plus brick chargers. If you need more outlets, mount a second tray 12 to 18 inches apart rather than piling everything into one.
Installing in cold or humid conditions weakens acrylic adhesive. Avoid mounting in garages or unheated rooms below 60 degrees Fahrenheit, and never mount right after cleaning with a wet cloth — moisture trapped under foam tape prevents bonding.
Using screws as a quick fix on a tape-only tray can split hollow-core desks. Those desks often have only a 1/8 inch veneer over cardboard honeycomb and will not hold a screw. If you want screw mounting, choose a tray designed for it with included screws and verify your desk is solid wood, MDF over 5/8 inch thick, or metal.
Pulling the liner off too early and touching the adhesive transfers skin oils that cut bond strength significantly. Peel liners only when you are ready to press up immediately.
How Often
Check the tray monthly by giving it a firm downward press with your hand. Look for any gap opening between the tape and desk, yellowing foam, or sagging of more than 1/4 inch — all signs the bond is creeping. Dust and wipe the desk underside every 3 to 6 months, as accumulated dust adds weight and insulates heat from chargers, which softens adhesive. Replace tape or strips every 18 to 24 months in warm offices or near heaters, even if it looks fine, because acrylic foam slowly loses elasticity. If you frequently adjust a sit-stand desk, inspect every 2 months since constant motion adds cyclic shear force.
When to Call a Pro or Replace
Replace the tray instead of re-taping if the mounting plate is cracked, the welds on a metal tray are broken, or the tray has been re-taped more than twice — multiple residue layers make a reliable bond difficult without professional solvents. Also replace if your desk underside is damaged, peeling, or made of unfinished particleboard that crumbles when scraped, as adhesive will never hold on a friable surface.
Consider switching to a screw-mounted or clamp-on tray if your total cable weight regularly exceeds 10 pounds, you have a glass-top desk where adhesive will not bond, or you have already had two adhesive failures in the same spot. A handyman or furniture installer can add threaded inserts or under-desk rails for $40 to $90, which is often cheaper than repeatedly buying adhesive trays in the $15 to $30 range. Call a pro if you need to route in-wall power or hardwired lighting through the desk — low-voltage cable management is DIY, line-voltage work is not.
FAQ
Why does my cable tray keep falling even with new tape?
Three reasons cause most repeats: the surface was not cleaned down to bare material, the tape was the wrong type, or the tray is overloaded. Lightweight double-sided foam rated for pictures at 1 to 3 pounds will not hold a tray with a surge protector. Use acrylic foam tape rated for at least 10 pounds, clean both surfaces with isopropyl alcohol, and keep the loaded weight under 80 percent of the rating. Also ensure the desk underside is not textured wallpaper or felt lining, which needs to be removed first.
Can I use super glue or hot glue instead of tape?
No. Super glue becomes brittle and cracks with vibration and heat from power bricks that can reach 110 to 130 degrees Fahrenheit. Hot glue softens in the same heat and peels away from smooth metal or laminate. Both can also damage desk finishes permanently. Stick with pressure-sensitive acrylic tape or the manufacturer-supplied VHB strips, which are designed to flex slightly and handle heat.
Will adhesive damage my desk finish when I remove it later?
High-quality acrylic tape can be removed cleanly if you heat it first and peel slowly at a low angle, then clean residue with alcohol or a small amount of mineral oil. Damage usually happens when people rip trays off cold or use metal scrapers. On solid wood or powder-coated metal, risk is low. On thin veneer or melamine, test heat on a hidden spot for 15 seconds first, and never yank — steady, slow peeling over 60 to 90 seconds prevents lifting the finish.
Are screw-mounted trays better than adhesive?
For heavy loads they are stronger and permanent, supporting 15 to 30 pounds when screwed into solid wood or metal. For renters, glass desks, or desks you may resell, adhesive is better because it leaves no holes. A good compromise for loads of 8 to 12 pounds is a clamp-on tray that hooks over the desk edge with no tools and holds firmly. Choose based on desk material and whether you are willing to make permanent holes.
